
Please remember to remove this template once the image(s) have been added.
These are items, and upgrades with limited chances to obtain. If certain decisions are made, or changes and events occur in the game before obtaining these items will no longer be available. This listing is intended to aid 100% Completion game runs.
Main Games
The Legend of Zelda
Possible time to miss the Heart Container
Four Heart Containers in each quest are missable if Link chooses the Potion instead of the Heart Container. It is ideal to never choose the Potion, because Link can buy Potions at any time in the game, but if he passes up a Heart Container it's gone forever.
In the Second Quest, there are three rooms with a choice of paying 50 Rupees or losing a Heart Container; Link can earn the Rupees back at any time, but not the Heart Container. If Link doesn't have enough Rupees, then he should leave the room and hunt more Rupees, then return when he has enough.
The Adventure of Link
Almost nothing is missable in this game, although it should be noted that whenever Link completes a palace, it turns to stone in the overworld and he will never be able to enter it again. However, it only becomes stone when he:
- obtains the main dungeon item, and
- places the crystal in the statue after the boss battle.
Therefore, if the young hero does 2 but not 1, he can still return to claim the item. However, with both things being done, the palace will be closed, and Link won't be able to return to gain additional experience or collect treasure bags.
1-Up Dolls
Also of note are the 1-Up Dolls. It's not possible to miss these permanently, with the exception of the one located in the sixth palace, for the reasons written above. Also, when Link does get one, it's gone for the rest of the save file, even after the player quits and returns to the game. Therefore, it's best to plan wisely and strategically when hunting them all down. For instance, it would probably be better to wait until all the palaces have been completed except the Great Palace, and then go retrieve them all. (Once Link's stats are maxed at level 8 in all three areas—strength, life and magic—the character can get a 1-Up for each 9000 experience points being gained.)
Treasure Bags
Treasure Bags containing experience points, as those are also one-shot deals as soon as Link obtains them. It's wise to collect them strategically because, once a bag is retrieved, the young hero cannot get it back. Therefore, Game Over cutscenes must be avoided at all costs after obtaining any of these set Treasure Bags without leveling up, since either a Game Over cutscene or restarting the game puts the experience points gained as of that moment back down to zero again. That said, there are many more Treasure Bags in this game than Dolls.
A Link to the Past
Dungeon Map and Lamp Chest
Because Hyrule Castle becomes inaccessible after defeating Agahnim in Hyrule Castle Tower, Link will not be able to access the dungeon's Dungeon Map if he fails to open the chest containing it. Not only that, but there are two rooms on the first floor that Link could fail to visit, leading the map to be incomplete. Finally, there is a chest next to Princess Zelda in the dungeon that contains either the Lamp (or more likely a Blue Rupee if Link already has the Lamp) which will also be inaccessible after defeating Agahnim. The Lamp is available from three chests, and Link needs it to progress through the secret passageway so it is not missable, but the chest next to Zelda is. Link would have to purposely avoid all such items unless he did not know how to open the chests, as Link has to visit all the rooms containing the chests as he progresses through the dungeon, and they are all in plain sight. Failing to explore all the rooms on the map, however, is an easier mistake to make, as there are two paths through the first floor.
Boomerang Chest
If Link does not open the chest containing the Boomerang in Hyrule Castle, he will not be able to obtain it from said chest when the dungeon becomes inaccessible after defeating Agahnim in Hyrule Castle Tower. However, the Boomerang itself is not permanently missable, as it can be obtained from a chest in Kakariko Village that would normally hold Arrows. The chest in Hyrule Castle will then contain arrows, but will still be missable, although arrows are freely available elsewhere. If Link does not collect the Boomerang from either chest, he has the option to get the Magical Boomerang from a chest in the Village of Outcasts which would normally contain 300 Rupees.
Link's Awakening
The Travels of Link
Four pictures (DX version only) out of the 12 are missable in this game. First, to trigger the photography side quest, Link must visit the Photo Shop and speak to the mouse who runs the place. After that, he'll show up at various times during the adventure to take pictures. It's possible to miss 4 of these such moments forever after a certain point, though. The last three, in fact, are all taken while escorting Marin to Animal Village. So here they all are:
1.) The first is the picture of Link with Richard in front of the gate to Kanalet Castle. It's required to walk to the castle entrance while it is still closed. Then Richard will appear and the photographer show up to take the picture. Link must not step on the switch inside Kanalet Castle until he has obtained this photograph! (see left)
2.) The second is the picture of Link with Marin on the seashore, at the southwesternmost tip of Koholint Island. It's simply about going straight there once she starts following Link, and the photographer will do the rest. (see right)
3.) The third is the picture of Marin falling on top of Link at the bottom of a well. One screen north of the Village Library is a hole. The first step is to cut the bushes up above it and jump in. Once the young hero lands in the cave below, he must not move but let Marin land on Link. (see left)
4.) The fourth is in the Mabe Village town square, in front of the weathercock, as Link poses with both Marin and Tarin. It's simply about going there when Marin is following Link, and Tarin and the photographer will meet them there. (see right)
For photos #2-4, he must not prompt Marin to awaken the walrus near Animal Village until he has obtained all three of these photographs. In the case of uncertainty, Link can check the photo shop near Tal Tal Heights before parting with Marin.
On a more minor note regarding the pictures, the very first picture Link takes is not missable, but it's variable—and whatever choice the character makes will be what he will see as long as the game file is current. During the first dialogue with the photographer, if Link agrees to take a picture, then the first picture will be of Link posing with a peace sign. If he continually rejects the photographer, though, he'll take a picture of a beat-up Link. As previously mentioned, however, only one of these images can be kept.
Secret Seashells
3 Secret Seashells are missable, out of 26. Once Link has exactly 5 Seashells (no more, no less), he must go to Seashell Mansion to gain a 6th. Likewise, once he has exactly 10 Seashells (no more, no less), he must return there to gain an 11th. The third missable Seashell is the one near Kanalet Castle's entrance that must be accessed with the Flying Rooster (so Link must not complete the Eagle Tower before doing this). None of this is actually a concerning issue, however, since Link only needs 20 of the 26 Secret Seashells to forge the L-2 Sword. After Link has powered his sword up, all remaining Secret Seashells in the game turn into Rupees, and the slot for Secret Seashells on the pause menu's inventory disappears. So if Link wants the transitory satisfaction of having all 26 Secret Seashells on the inventory, he must search them all out and hold off on returning to the Seashell Mansion until he has found them all. Once again, however, the number and seashell icon will vanish once Link gets the L-2 Sword.
Minor notes
If Link successfully steals from the shop in Mabe Village, Link loses the original name that was created for himself for the rest of the file, as everyone in the entire game now will address him as "THIEF." It's up to the player whether or not give up the assigned name like this or not, but if Link is experiencing the DX version, Link actually has to become THIEF in order to complete the photography side quest—the young hero just mustn't go back into the shop.
Ocarina of Time
Deku Nut Upgrade
A Deku Nut upgrade is permanently missable due to a glitch in the Nintendo 64 version of the game, as well as in the Collector's Edition, Master Quest releases and Virtual Console ports. If Link enters the Lost Woods from Kokiri Forest, goes to the Forest Stage and dons particular masks, the Deku Scrubs will offer various types of rewards. Wearing the Skull Mask results in earning the Deku Stick upgrade, (this can be obtained at any time) and wearing the Mask of Truth nets Link the Deku Nut upgrade.
The Deku Nut upgrade will work only if Link has not obtained the Poacher's Saw in the Adult Link era. If done the opposite, wearing the Mask of Truth in front of the Deku Scrubs will get a variety of reactions, but it won't result in the desired upgrade. As such, Link must not obtain the Poacher's Saw in the Trading Sequence until having obtained this upgrade. Contrary to some fan notions, the running man on Hyrule Field (to whom Link sells the Bunny Hood, the last step required before Link can get the Mask of Truth) can be found before pulling out the Master Sword, if Link looks for him after obtaining Zora's Sapphire.
This happens because all the quests in the game have "finisher flags" that mark them as complete. The Poacher's Saw was mistakenly set to the same flag as the Deku Nut Upgrade,[citation needed] probably because items tend to be set by area and the Saw and Upgrade are technically in the same position. When the saw is obtained, the game is falsely notified that the Deku Nut Upgrade has already been obtained as well, even if it hasn't. Only the upgrade suffered from this bug and not the saw, which explains why it was missed by the game's beta testers, who probably always obtained the upgrade before pulling the Master Sword.
This glitch has been fixed in Ocarina of Time 3D.
Piece of Heart
If the Piece of Heart in the Heart-Pounding Gravedigging Tour is dug by Dampé but not retrieved before leaving the area, it cannot be obtained again.
Dungeon Map
The dungeon map for Inside Jabu-Jabu's Belly is located behind a locked door that is unlocked by a blue switch. Normally, you are to drop Ruto on the switch and leave her behind to enter the room, but after completing the dungeon Ruto will no longer appear inside Jabu-Jabu, making the map impossible to obtain through normal means. To get into the room after the dungeon is complete, you can perform a simple glitch that keeps the door open for longer after stepping on the blue switch. Start by dropping and re-catching a bottle of bugs or fish, putting a giving you a bottle on hand. Then, backflip onto the switch and drop your bugs/fish in mid-air. When you land, you should unlock the door without fully depressing the switch.
Majora's Mask
Treasure Chest
One Treasure Chest is said to be missable at the very beginning of the game. It's on a spot in the chasm that precedes the area where Link finds the Happy Mask Salesman, and it contains Deku Nuts. Even if the chest is opened, the chest always reverts back to the unopened state when the Song of Time is played.
Oracle Series
Ring Box Upgrade
The Ring Box L-3 upgrade is permanently missable through a glitch when playing a Linked Game in the Japanese versions of Oracle of Seasons or Oracle of Ages (the European versions fixed this glitch, but it is not currently known if it still affects the North American versions). If the player has already acquired a Ring Box L-2 over the normal course of the Linked Game (by receiving it from the Goron at Goron Mountain or by buying it in the Lynna Village Shop), the secret for Farore will not work anymore: it can still be entered on the password screen and a message appears that Link has received Ring Box L-3, but Ring Box L-2 will remain in the inventory. To avoid this, the player has to complete the Ruul Secret or the Symmetry Secret quest with Ring Box L-1 still in the inventory. Preferably, the secrets are taken back to Holodrum or Labrynna as soon as they become available (upon beating the second dungeon in the Linked Game). After upgrading the Ring Box in the non-linked game (the glitch won't happen in a non-linked game, so it doesn't matter if Ring Box L-1 or L-2 is in the inventory), the player receives a password which he then gives to Farore in the Linked Game. This will result in the Ring Box L-2 upgrade. From then on, Ring Box L-3 is available over the normal course of the game (receiving or buying, as mentioned above).
Choices spanning both games
While these are not missables, some choices must be made throughout the course of the (linked) adventures which will carry over from the first game into the second, linked game as well.
The first area of decision is the sidequest involving the growth and development of Bipsom, whom Link even gets the honor of naming. Certain decisions Link makes for him at one stage of his life will permanently affect the course that later stages of his life will take. The second area of decision is the choice of animal companion and their accompanying flute. Link can choose between three companions—Ricky, Dimitri, or Moosh—and once the choice is made, Link gets that one's particular flute, which means he can't get a flute for the other two. The following shows briefly how to choose the particular animal for Link in each game.
Oracle of Ages:
- Moosh: Since Moosh is Link's default partner in this game, he simply has to carry on in his quest as normal, and once he leaves Lynna City (in the present) to the west, he needs to go north once up the steps and use an Ember Seed to burn the bush across the river, activating the switch that builds a bridge. He then has to go across and north, then Moosh will be his.
- Dimitri: To recruit Dimitri instead, Link simply has to buy his flute from the shop in Lynna City (present) for 150 Rupees. He must not burn the bush and activate the bridge switch north of Lynna City until he's bought Dimitri's Flute if this is the animal Link wants for his heroic character.
- Ricky: To recruit Ricky instead, Link needs to keep winning the Shooting Gallery mini-game in Lynna Village (past) until the prize given out to him is Ricky's Flute. He must not burn the bush and activate the bride switch north of Lynna City until he's won Ricky's Flute if this is the animal Link wants for his heroic character.
Oracle of Seasons:
- Ricky: Since Ricky the kangaroo is Link's default partner in this game, he simply has to carry on in his quest as normal, and once he reaches the area 1 screen north and west of the tree stump where he originally met Din (this would be North Horon), picking up the rock and going north through the gate, then Ricky will be his.
- Dimitri: To recruit Dimitri the dinosaur, Link needs to keep winning the Subrosian Dance (after he's won the Boomerang) until the prize given out to him is Dimitri's Flute. He must not enter the area of North Horon where he must lift the stone and pass through the northern gate until he's won Dimitri's Flute if this is the animal Link wants for his heroic character.
- Moosh: If Link likes to join up with Moosh the bear, the first step is to simply buy his flute from the Horon Village shop for 150 Rupees. Again, Link must not enter the area of North Horon where he must lift the stone and pass through the northern gate until he's bought Moosh's Flute if this is the animal Link wants for his heroic character.
- OoX Link and Moosh.png
Moosh
- OoX Ricky.png
Ricky
- OoX Link and Dimitri.png
Dimitri
The Wind Waker
Nintendo Gallery Figurines
16 figurines in the Nintendo Gallery sidequest are permanently missable during a single playthrough of this game, though they can be found on subsequent playsthrough:
- Six Big Octos can be found in different sectors of the Great Sea; if Link defeats them all before taking a Pictograph of one, it will not be possible to obtain their Figurine.
- A Pictograph of Cyclos must be taken before obtaining the "Ballad of Gales" from him, as he disappears once he teaches the song to Link. Cyclos's Figurine also includes Zephos, his brother.
- Phantom Ganon is battled once in the Forsaken Fortress and later on in Ganon's Tower. Link must take a Pictograph of it before defeating it with the Light Arrows during its final appearance.
- A Pictograph of the Helmaroc King must be taken during the battle against it in the Forsaken Fortress before it is permanently defeated.
- A Pictograph of Kogoli must be taken before awakening Medli as the Sage of Earth, as he vanishes from Dragon Roost Island after this event.
- A Pictograph of the Wizzrobe mini-boss in the Wind Temple must be taken before it is defeated in order for Link to obtain its Figurine.
- Tetra's Figurine, as well as those of her crew, must be obtained by taking her Pictograph while escorting her to the basement of Hyrule Castle.
- A Pictograph of Puppet Ganon must be taken during the battle against it before it is permanently defeated.
- Knuckle's Figurine is not required to complete the Nintendo Gallery in the original game. If Link wishes to obtain his Figurine, he must do so before obtaining every other Figurine as Carlov disappears once the Gallery is complete.
- If any of the above Figurines are missed, the Figurine of Link and the King of Red Lions, which is rewarded by completing the Nintendo Gallery, will also be rendered unobtainable as a result.
During the Second Quest, all figurines obtained during the first playthrough will be carried over, giving Link another chance to obtain any he may have missed. He also starts off the Second Quest with the Deluxe Picto Box, allowing earlier pictographs to be taken of Tetra on Outset Island and the Helmaroc King during the first visit to the Forsaken Fortress.
In The Wind Waker HD, the Tingle Bottle could be used to send and receive pictographs from other players through Miiverse, even those of subjects that had already been missed in the current playthrough. Since the service has been discontinued however, this is no longer an option.
Blue Potion in the Potion Shop
Link needs 15 samples of Chu Jelly to help the shopkeeper from Windfall Island, Doc Bandam, to make the Blue Potion. There are only 23 sources of Blue Chu sample across the Great Sea, so if the young hero sells more than eight of them to Beedle, this objective will be ruined permanently.
The Minish Cap
Light Arrows
Light Arrows are missable. If Link reaches Cloud Tops (via the whirlwind atop Veil Falls) having not rid him of the ghost, Gregal will be dead and the Light Arrows permanently out of reach. So Link must not ride the whirlwind to Cloud Tops until having warped to the Tower of Winds and healed Gregal of his ghost.
Kinstone Fusion
In the PAL version of the game, one Kinstone Fusion becomes impossible after a certain point in the game, resulting in the loss of one Bottle, an appearance by Biggoron, and the Mirror Shield. The source of this problem is Eenie, a farmer in the Eastern Hills region. If Link begins to fuse with him but then quits and leaves the area, a glitch will activate, and the game will never give the option to perform the fusion again. This glitch is not present in the Japanese and North American versions of the game.
Treasure Chest
A frozen treasure chest located in the tunnel underneath the Royal Hyrule Library in Hyrule Town can become missable. This chest is frozen in a block of thick ice, requiring the Lamp to thaw. Once Link has obtained the Lamp, he can re-visit the tunnel by shrinking himself using a Minish Portal on the second floor balcony of the Library and descend the vines to the nearby water canal, where the tunnel's entrance is. However, both the tunnel and its treasure chest are impossible to access once the Library and its Portal become inaccessible later in the game, when Link returns to the Elemental Sanctuary with the fourth Element and fuses his sword into the Four Sword. As such, the young hero must not obtain the Four Sword until after he has opened this chest.
Carlov Medal
The Carlov Medal can become permanently unobtainable under certain conditions caused by a recently discovered glitch. If Link obtains all of the figurines that he can currently get and attempts to draw the lottery again, the chance of him getting a new figurine will be 0%. However, it is possible for Link to still get a new figurine. If this happens, the new item sound will play and the figurine will be added to the collection case on the left, but Carlov will treat it like a repeat and pay Link 5 Rupees. The significance of this is that despite being added to the collection case, the figurine isn't considered to be obtained by the game. Once Link obtains all 136 Figurines, Carlov will not award Link with the Carlov Medal, but instead saying that there is still a 1% chance of getting a new figurine. That 1% chance is the glitched figurine Link should not have gotten.
To avoid this glitch, Link must NOT draw again after Carlov falls on his back and informs Link that there are no more new figurines to get. Doing so may cause Link to get a glitched figurine of something he hasn't encountered yet, resulting in the Carlov Medal being unable to be obtained.
Charms
While these are not missables, some choices must be made throughout the course of the adventure regarding the Charms. The Charms are three items of which only two at the most can be obtained. They are granted to Link by the three Oracles,[1] provided he first finds houses for them. Because there is no third house in the game, one will have to choose which two charms they prefer to have. The Charms are carried in Bottles.[2]
Twilight Princess
Letters
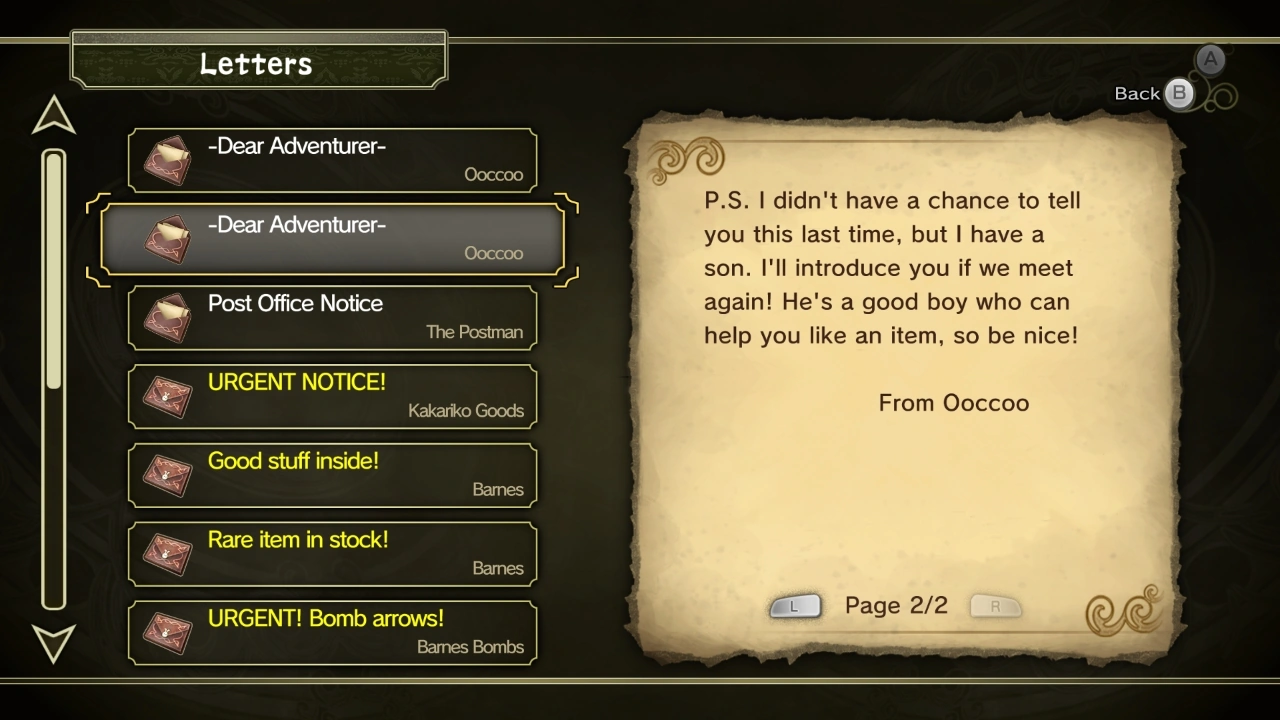
Letter from Ooccoo
Two letters from the Postman, out of 16, can be missed:
- The first letter from Ooccoo says she was happy to meet Link and will appear again at a different location. She also adds a P.S. about a son she has. Link gets this letter after completing the Forest Temple, as long as he does not use her to warp out of that dungeon. That is, Link must find Ooccoo, but not use her, in the first dungeon.
- The second letter from Ooccoo says she was happy to meet up with Link and happy to see her son again, concluding by saying she will be going to another location. He can get this letter after most any dungeon in the game by using Ooccoo there. But the last dungeon where Ooccoo will appear is City in the Sky (there are two others after that, Palace of Twilight and Hyrule Castle, but Ooccoo will not be at either one), so therefore Link must find and use Ooccoo before finishing any dungeon up to Temple of Time. Therefore, Link must not defeat Armogohma and clear the Temple of Time until having used Ooccoo to warp out of a dungeon and back in at least once.
Ordon Shield
The Ordon Shield is losable if it gets burned by fire. This is just a minor note as Link can easily purchase a Wooden Shield from numerous shops in Hyrule. The Wooden Shield works just the same as the Ordon Shield, but it has a different design and different name.
Phantom Hourglass
Eddo's Letter and Ship Part
After the third visit to the Temple of the Ocean King, the Salvage Arm must be purchased. Upon approaching a mailbox, Link receives a letter from Eddo advising him that the Salvage Arm is ready.[3] However, the better course of action is to go directly to Eddo and buy the Salvage Arm before checking the mailbox. If this is done, the letter will instead thank Link for his purchase, and a bonus Ship Part will be included.[4]
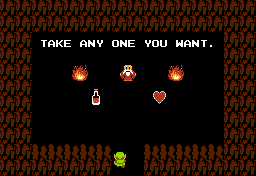
Heart Container
One Heart Container in a treasure chest is missable, but this only happens under some obscure conditions. After the defeat of the Diabolical Cubus Sisters on the Ghost Ship, the prize will be the usual Heart Container in the large treasure chest. However, since the Ghost Ship is the one dungeon that can never be re-entered, it is possible to bypass this chest and go on without it. Mercifully, even if Link does pass it up, the Postman will come and attempt to deliver it to Link. When he brings it to him, he asks Link if he wants it. Choosing "Yes" would be the best option, but choosing "No" instead will make it be gone forever.
Treasure Chests on Ghost Ship
There are some Treasure Chests on the Ghost Ship that can be permanently missed. One contains a random Treasure, one contains ten Rupoors and a couple of others contain either Potions or Rupees. There are also two Crystals, at least one of which is optional. Again, once the Ghost Ship level has been completed, it cannot be revisited so all of these items are permanently lost.
Skyward Sword
Isle of the Goddess Treasure Chest
There is a small treasure chest containing 20 Rupees on the pathways winding around the Isle of the Goddess. Although it is hard to miss at the beginning of the game, when Fi leads Link past it, the chest disappears once the Sky Keep is revealed.
A Link Between Worlds
Rosso's Chest
When Link obtains the Power Glove from Rosso, he asks the young hero to clear the area around his house. After Link destroys all small rocks on the outside, Rosso will make a chest appear in his house containing 50 Rupees. This can't be done after completing the Tower of Hera.
Breath of the Wild
Divine Beast Chests
The interiors of the four Divine Beasts cannot be revisited once Link has activated their main terminals, as they subsequently take aim at Hyrule Castle with their lasers and are deemed too dangerous to approach. As such, the contents of any treasure chests still inside them will be lost once they are returned to the Champions' control. All of these chests are optional, containing items such as Rupees, weaponry, and various Materials, which can be recuperated from elsewhere across Hyrule.
Thunder Helm
If Link receives the Thunder Helm while his Armor inventory is full, the item will not appear in the inventory nor will return to its pedestal, therefore, the Thunder Helm will be permanently lost.[5]
Lynel Weapons
Except for the Lynel atop Ploymus Mountain, the Blue-Maned Lynel in the First Gatehouse, and the White-Maned Lynel in the Second Gatehouse, all Lynels permanently scale up based on a hidden point system which is determined by enemies that are slain. The Lynel in Coliseum Ruins scales upon completing each of the Divine Beasts. Consequently, the equipment they wield scales alongside them and can be permanently lost.
After all possible Lynels scale to Blue-Maned Lynel or greater, Lynel Crushers and Lynel Spears stop appearing. As the Lynel atop Ploymus Mountain remains unscaled, it is still possible to obtain Lynel Swords, Lynel Shield, and Lynel Bow. Once all Blue-Maned Lynels scale to White-Maned Lynels or greater, Mighty Lynel Crushers and Mighty Lynel Spears stop appearing. As it is possible to obtain the equipment from the Blue-Maned Lynel in the First Gatehouse,[note 1] it is still possible to obtain Mighty Lynel Swords, Mighty Lynel Shields, and Mighty Lynel Bows.
To account for the automatic scaling in Master Mode, Blue-Maned Lynels bear basic Lynel equipment and their equipment begins scaling from there. Additionally, enemies other than Lynels that have been introduced in Master Mode can be found wielding Lynel equipment, such as a Blue Bokoblin that wields a Mighty Lynel Bow at Boneyard Bridge and a Blue Lizalfos that wields a Lynel Spear at Sokkala Bridge. Because of these enemies, it is only possible to miss Lynel Crushers, Mighty Lynel Crushers, and Mighty Lynel Spears in Master Mode.
Other Games
Hyrule Warriors
Giant Bosses Tutorial
In version 1.6.1 or earlier, during the first play-through of the Legend Mode Scenario, The Armies of Ruin, if King Dodongo is defeated before it reaches the West Field Keep, the Giant Bosses tutorial pop-up message will not appear, and will be prevented from ever unlocking the tutorial entry in the tutorial list and from randomly appearing during the loading screens in Adventure Mode and Free Mode. The Giant Bosses entry, if unlocked, would appear in the tutorial list directly below either the Ghirahim, Demon Lord entry (Version 1.3.0 or earlier), the Twili Midna, Ruler of Twilight entry (Version 1.4.0), or the Tingle, the Reincarnated Fairy? entry (Version 1.5.0 or later) and directly above the Summoners entry.
Notes
- ↑ By saving and reloading inside the First Gatehouse.
References
- ↑ If you ever need a charm, I'll give you another, so just ask! - Din/Farore/Nayru (The Minish Cap).
- ↑ If you have an empty bottle, I can put one of my homemade charms inside! Just ask anytime! - Din/Farore/Nayru (The Minish Cap).
- ↑ "Hey you, Link! I've got some very big news. Big, big news. See, I've been working on a Salvage Arm for a long time, but now it's ready! This gorgeous piece of machinery lets ships pull up treasure from the sea floor! I'm gonna sell this thing to the first one who gets here. Ready, set...sail! Who's gonna be the lucky customer to claim it?" — Eddo (Phantom Hourglass)
- ↑ "Hey, Link! Thanks for buying the Salvage Arm! As an added bonus, I'm sending you this gift! Seriously, take it! It's all yours!" — Eddo (Phantom Hourglass)
- ↑ Template:Cite web