Template:Enemy Dodongos (pronounced /dɵˈdɒŋɡoʊ/ də-DONG-goh)[1] are recurring enemies in the The Legend of Zelda series.
Characteristics and Weaknesses
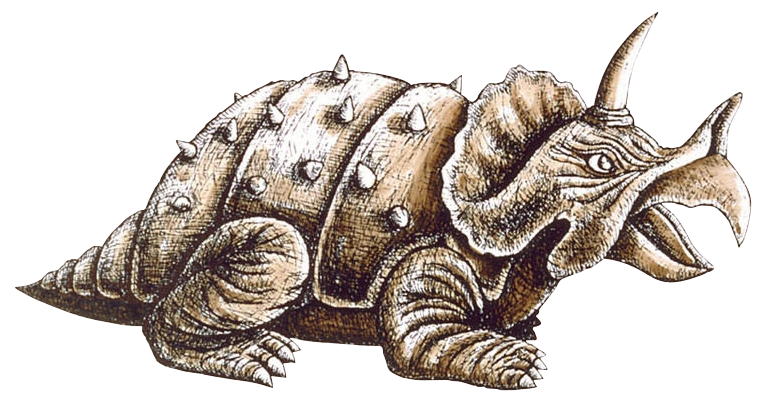
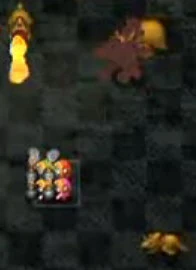
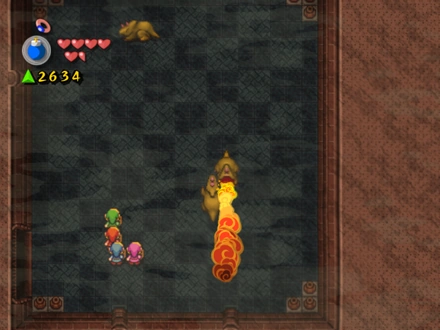
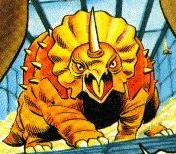
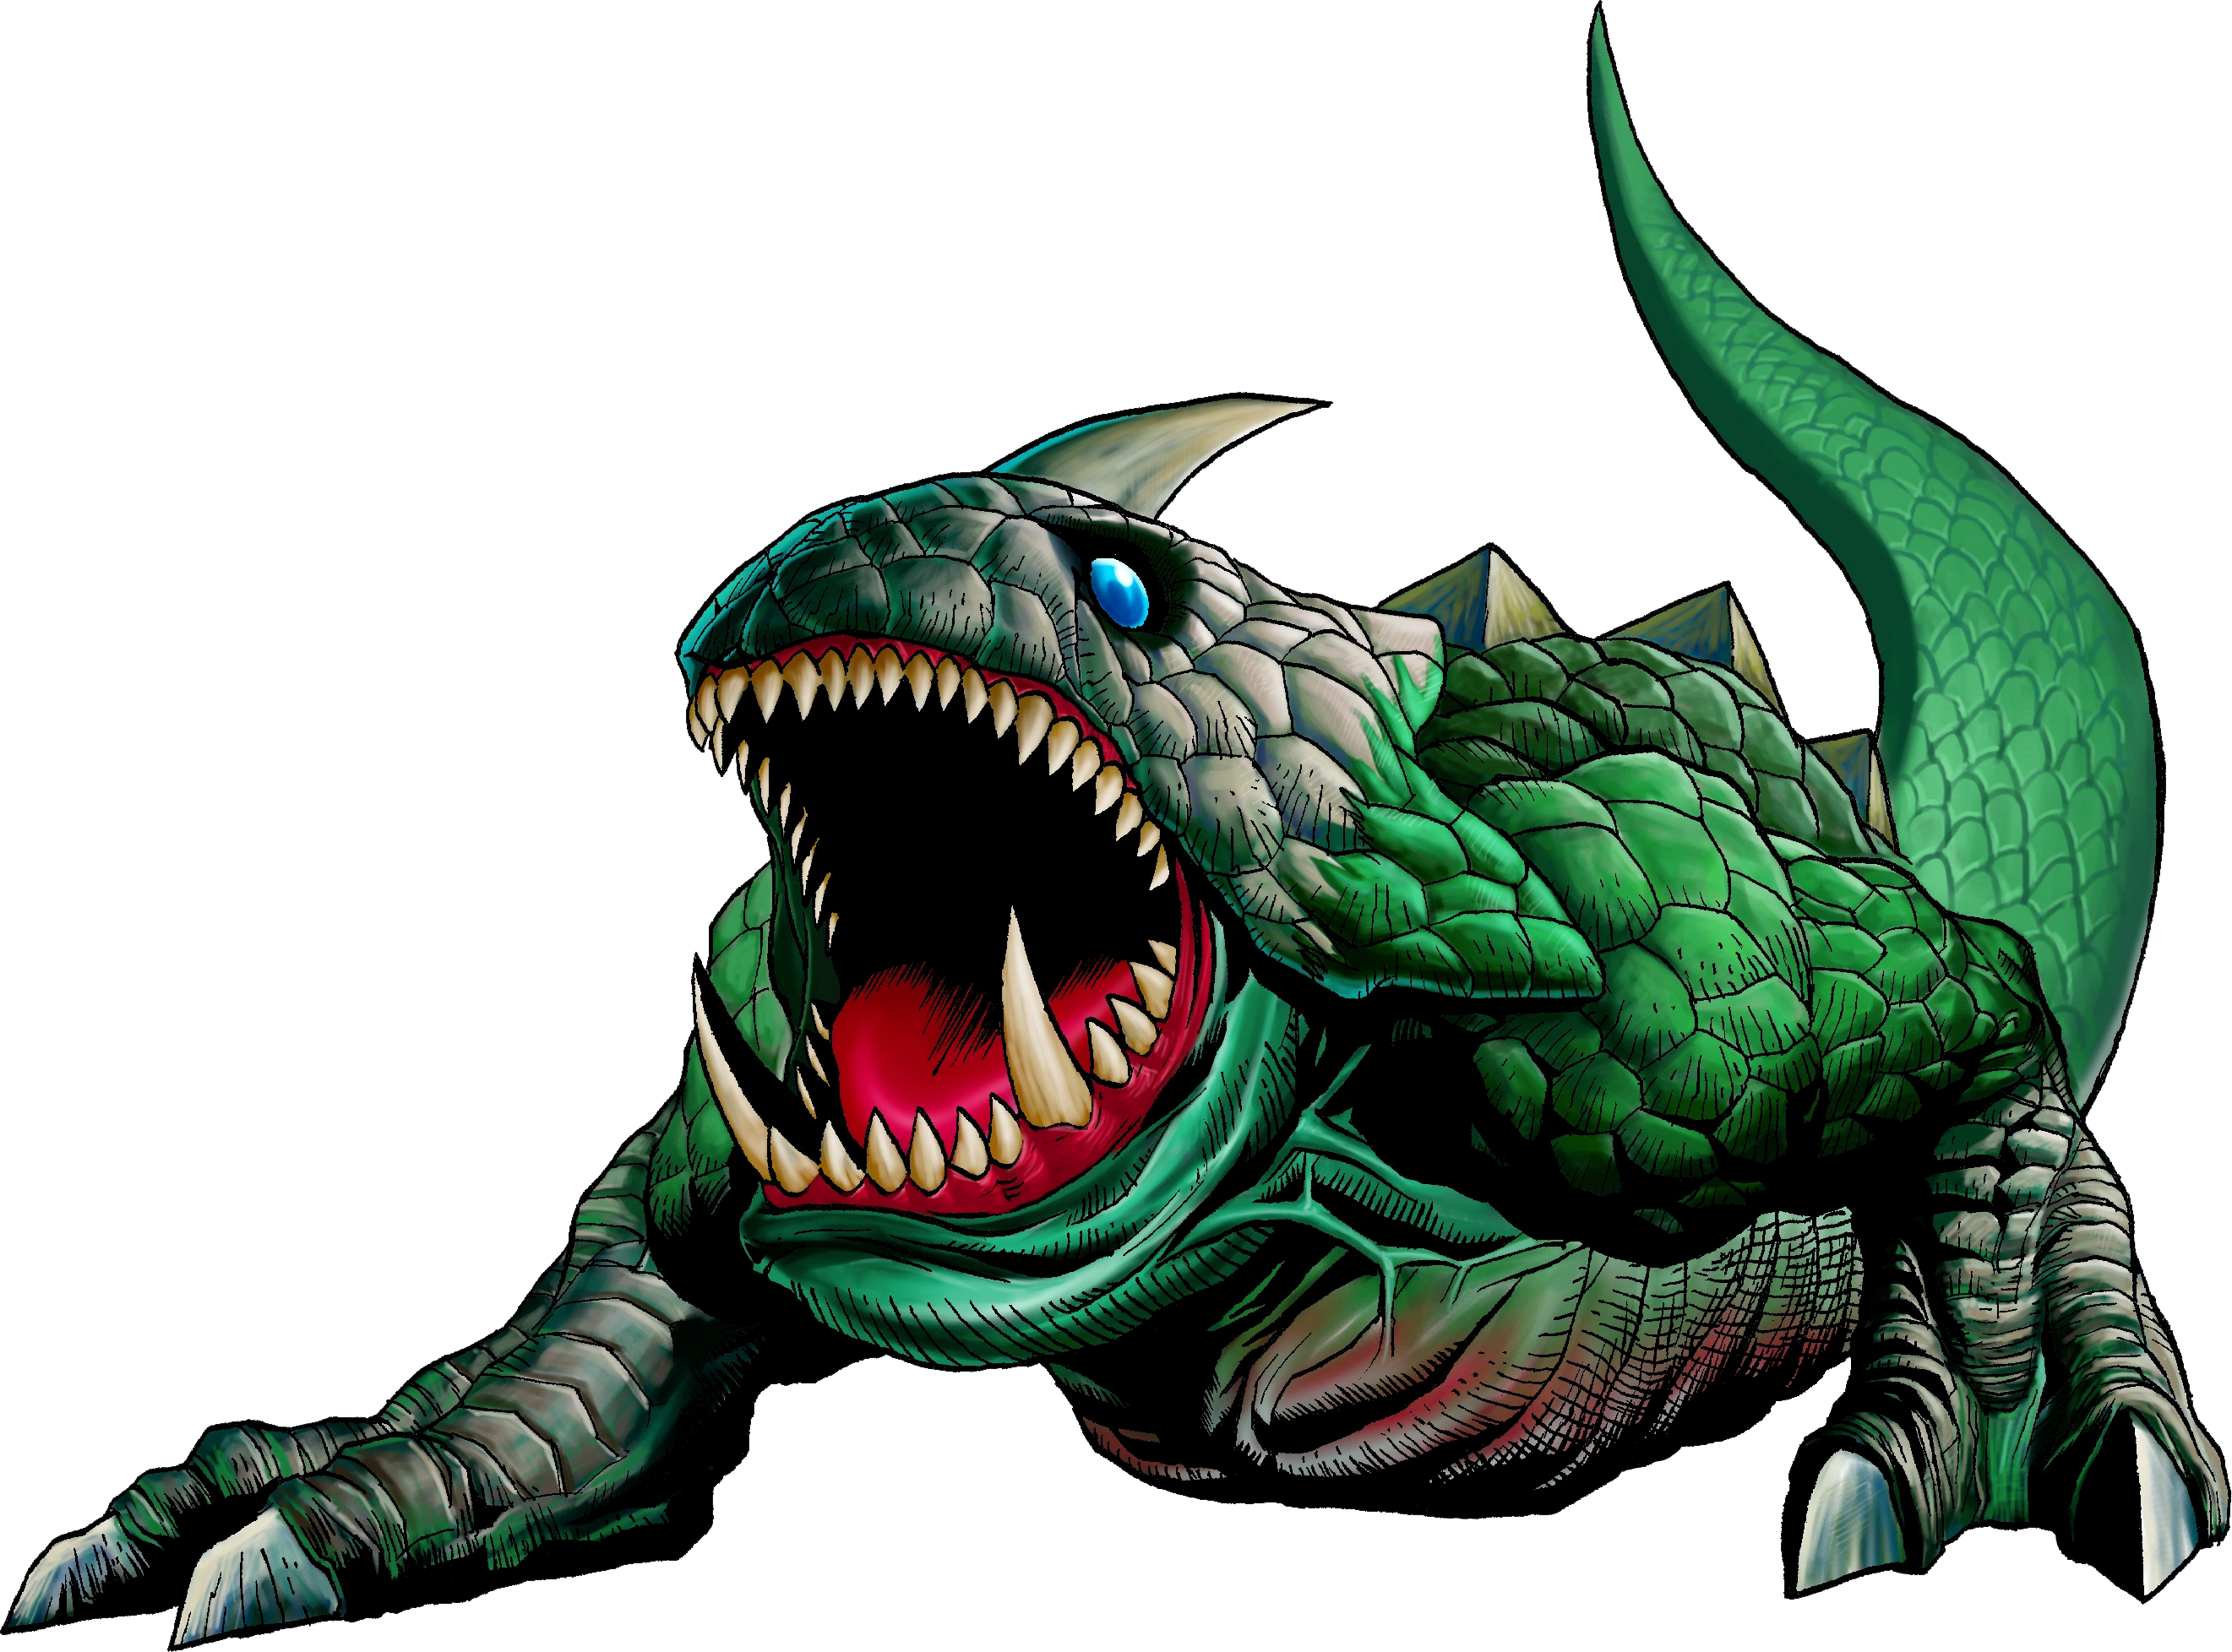
Dodongos are reptilian monsters usually found in caves and volcanic environments. Throughout the series, it has resembled both a Triceratops or rhinoceros-like creature in early Zelda games,[2] as well as bipedal, monstrous lizards in Ocarina of Time and Majora's Mask, and gecko-like creatures in Twilight Princess. Physically, these creatures have very tough hides, ribbed with green or sometimes yellow scales that serve as strong armor that protects them from any attack.[2] In the same vein, Dodongos also have very large mouths in proportion to their bodies. These grand cavities enable them to suck in air to blow streams of flames, which is their primary form of attack. However this also makes their mouths the species' primary vulnerable site. A Bomb can be thrown down their gaping mouths, which will explode from within, heavily damaging the creature. For this reason, Dodongos are widely known for their weakness to Bombs.[3] The best opportunity to throw the explosives is when these enemies suck in air in preparation for their fiery attacks, which will also inhale the thrown Bomb. In Twilight Princess, an Arrow may also be shot into the gaping mouth of a Dodongo to inflict it internal damage as well.
Another, although less common, vulnerable site is the tip of its tail. However, Dodongos can also harm Link with their tails by sweeping them around in a full turn. If the sweeping tail manages to make contact with Link, it will knock the hero off his feet, damaging him. While these enemies are often hard to defeat, they are quite slow moving creatures,[4] and are easily avoided or confounded into showing their weak spots.
The sizes of Dodongo range greatly between games and regions. In Majora's Mask, two sizes of Dodongo are known to exist in Termina: the smaller variants in the North-East area of Termina Field, and the much larger sizes to the North-West section of the field. These Dodongos reward Link with large quantities of Rupees upon defeat; the big Dodongo yields a Purple Rupee when destroyed, and a Red Rupee for a regular Dodongo. There are also two large Dodongos found in a Secret Grotto near the entrance to Ikana Canyon, which defeating them earns Link 100 Rupees and a Piece of Heart from a chest nearby.
Despite the dangers they pose, the scales of a Dodongo are also a valuable resource. Gorons use them to make their heat-resistant Goron Tunics, one of which Link can purchase in Ocarina of Time.[5] The stomach linings of Dodongos are also used to make Bomb Bags as well.[6]
The Legend of Zelda
Template:TLoZManual In The Legend of Zelda, Bombs are needed in order to defeat Dodongos. Link can either defeat Dodongos by placing two Bombs in their mouth or by Bombing their side and hitting them once with any sword. If they are defeated with a sword, Link is rewarded with four Bombs. When defeated with Bombs, Dodongos may drop either a Heart, a Fairy or one Rupee.[note 1]
Varieties
Bosses
Dodongos have commonly appeared as a boss, appearing in several titles to date as such, the most prevalent being Ocarina of Time, where the massive King Dodongo makes an appearance at the end of the Dodongo's Cavern. Dodongos first appeared as bosses in The Legend of Zelda, sometimes appearing in pairs or as a mini-boss, and have also appeared as bosses in the Template:OoX and in Four Swords Adventures. Unlike the common Dodongo, more than one Bomb must be used to vanquish these foes, and rightly so, as they are not only bigger, but stronger than their commonplace counterparts. Exclusively in Oracle of Seasons, Link must equip the Power Bracelets to hoist the boss into Floor Spikes after assaulting it with a Bomb, as the explosive will merely stun it.
Dimitri
Not all Dodongos are hostile creatures. In the Oracle series, there is a benevolent Dodongo by the name of Dimitri, who co-operates with and helps Link in Holodrum and Labrynna. Dimitri is a River Dodongo, he can swim across deep water and up waterfalls to help Link gain access to previously outlying areas. Due to the type of Dodongo Dimitri is, he does not breath fire like his wild counterpart but he still has the large mouth, which he uses to eat Link's foes. In order to reach him, the Strange Flute (which will later be identified as Dimitri's Flute) is needed, especially to summon him at will in both games.
Other Appearances
The Legend of Zelda TV Series

Dodongo from The Legend of Zelda TV series
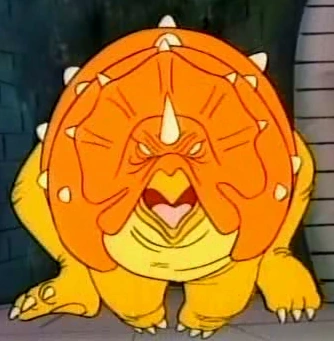
A Dodongo also makes an appearance in the The Legend of Zelda TV series episode "The Moblins Are Revolting". After Link and Princess Zelda arrive to an almost-deserted Underworld, a Dodongo comes charging in their direction. Link pushes Zelda out of the way and shoots various Sword Beams at the beast, but to no avail. Just as the Dodongo is approaching Link once again, Zelda throws a Bomb at its mouth, which instantly defeats it.
The Legend of Zelda Comic
In The Legend of Zelda, Princess Zelda encounters a Dodongo while she is in training in Level-1. When Miff appears to look out for Zelda, she warns the princess about the Dodongo behind her, allowing Zelda to defeat it with her last Bomb.[8]
Nomenclature
The name Dodongo could be derived from ドドン (Dodon), the Japanese onomatopoeia for the sound of an explosion.
| Language | Name | |
|---|---|---|
| Japanese | ドドンゴ (Dodongo) | |
| ChineseSI | 多东哥 (Duōdōnggē) | |
| FrenchCA | Dodongo Template:ExpGame | |
| FrenchEU | Dodongo | |
| German | Dodongo | |
| Italian | Dodongo Template:ExpGame | |
| Korean | 도동고 (Dodongo) | |
| SpanishLA | Dodongo Template:ExpGame | |
Gallery
- TLoZ Dodongo Million Publications Artwork.png
Dodongo artwork from The Legend of Zelda Million Publishing guide

Dodongo from The Legend of Zelda

Dodongo from BS The Legend of Zelda

Dodongo from Ocarina of Time 3D

Dodongo from Oracle of Seasons
- DodongoFSA.png
Dodongo from Four Sword Adventures
Dodongos from Four Swords Adventures
Dodongos from Four Swords Adventures
- DodongoTP.png
Dodongo from Twilight Princess
Dodongo from The Legend of Zelda comic
- Dodongo FoE.png
Dodongo from The Faces of Evil and The Wand of Gamelon
See Also
Notes
- ↑ If Link defeats 10 enemies without getting hit or teleporting with the Recorder, then the 10th enemy defeated will drop five Rupees. However, if the 10th enemy is defeated with a Bomb, then it will drop four Bombs. If Link defeats 16 enemies without getting hit or teleporting, then the 16th enemy will drop a Fairy. After the 16th enemy, Link must get hit and reset the counter to zero in order to achieve this effect again. Defeating Armos, Like Likes, Keeses or Gels will not be counted.[7]
References
- ↑ Template:Cite web
- ↑ 2.0 2.1 "A giant rhinoceros. It hasn't got so much attack power, but it bounces off attacks with its thick hide." (The Legend of Zelda (Game) manual, pg. 37)
- ↑ "DODONGO DISLIKES SMOKE." — Old Man (The Legend of Zelda)
- ↑ "The problem is those things have skin as hard as rock. Even with my strength, it's a waste to hit them. I can't even make a dent! But then it came to me! They may be tough on the outside but weak on the INSIDE! So right when they open their mouths to breathe fire, gulp! And then... BLAMMO! What a great idea! ...But then I dropped my bombs in the lava!" — Goron (Four Swords Adventures)
- ↑ Template:Cite web
- ↑ "You found a Bomb Bag! This bomb-holding bag is made from a Dodongo's stomach!" — N/A (Ocarina of Time)
- ↑ Template:Cite web
- ↑ Template:Cite book
Mazura · Jermafenser · Rebonack · Carock · Gooma · Barba · Thunderbird ![]() · Link's Shadow
· Link's Shadow
Light World
Ball and Chain Trooper ![]() · Six Armos Knights · Lanmola Trio · Moldorm · Agahnim
· Six Armos Knights · Lanmola Trio · Moldorm · Agahnim ![]()
Dark World
Helmasaur King · Arrghus · Mothula · Blind the Thief · Kholdstare · Vitreous · Trinexx · Ganon
Super Helmasaur · Super Arrghus · Super Mothula · Super Blind · Dark Links![]()
Bosses
Moldorm · Genie · Slime Eye · Angler Fish (2D) · Slime Eel · Facade · Evil Eagle (2D) · Hot Head · Shadow Nightmares
Guardians
Rolling Bones ![]() · King Moblin
· King Moblin ![]() · Hinox
· Hinox ![]() · Dodongo Snakes x2
· Dodongo Snakes x2 ![]() · Lanmola
· Lanmola ![]() · Cue Ball
· Cue Ball ![]() · Master Stalfos x4 · Gohma Twins · Armos Knight
· Master Stalfos x4 · Gohma Twins · Armos Knight ![]() · Smasher
· Smasher ![]() · Grim Creeper · Turtle Rock · Blaino
· Grim Creeper · Turtle Rock · Blaino
Bosses
Gohma · King Dodongo · Barinade · Phantom Ganon · Volvagia · Morpha · Bongo Bongo · Twinrova · Ganondorf · Ganon
Middle Bosses
Lizalfos · Big Octo · Stalfos · Meg · Flare Dancer · White Wolfos · Dark Link · Dead Hand · Gerudo Thief · Iron Knuckle · Dynalfos
Bosses
Odolwa · Goht · Gyorg · Twinmold · Majora ![]()
Middle Bosses
Dinolfos · Gekko · Wizzrobe · Gerudo Pirate · Wart · Gekko and Mad Jelly
Captain Keeta · Iron Knuckle · Sharp · Igos du Ikana · Garo Master · Gomess · Eyegore
Bosses
Aquamentus · Dodongo · Mothula · Gohma · Digdogger · Manhandla · Gleeok · Medusa Head · General Onox ![]()
Sub-Bosses
Brother Goriyas · Facade ![]() · Omuai · Agunima · Great Moblin
· Omuai · Agunima · Great Moblin ![]() · Syger · Vire
· Syger · Vire ![]() · Poe Sisters · Frypolar
· Poe Sisters · Frypolar
Bosses
Pumpkin Head · Head Thwomp (2D) · Shadow Hag · Eyesoar · Smog · Octogon · Possessed Nayru · Plasmarine · Ramrock · Veran ![]()
Sub-Bosses
Giant Ghini · Swoop · Subterror · Armos Warrior · Great Moblin ![]() · Smasher · Vire
· Smasher · Vire ![]() · Angler Fish (2D) · Blue Stalfos
· Angler Fish (2D) · Blue Stalfos
Bosses
Gohma · Kalle Demos · Gohdan · Helmaroc King · Jalhalla · Molgera · Puppet Ganon ![]() · Ganondorf
· Ganondorf
Minibosses
Green Bokoblin · Moblin · Mothula · Darknut · Cyclos · Phantom Ganon · Stalfos · Wizzrobe · Mighty Darknut · Big Octo![]()
Bosses
Phantom Ganon ![]() · Stone Arrghus · Helmaroc King · Big Poe · Big Moldorm x2 · Frostare · Vaati · Ganon
· Stone Arrghus · Helmaroc King · Big Poe · Big Moldorm x2 · Frostare · Vaati · Ganon
Sub-Bosses
Chief Soldier · Shadow Link ![]() · Manhandla · Dodongos · Big Dark Stalfos · Gohma · Big Dodongo
· Manhandla · Dodongos · Big Dark Stalfos · Gohma · Big Dodongo
Bosses
Big Green Chuchu ![]() · Gleerok · Mazaal · Big Octorok
· Gleerok · Mazaal · Big Octorok ![]() · Gyorg Pair · Vaati
· Gyorg Pair · Vaati ![]()
Sub-Bosses
Madderpillar ![]() · Dark Nut · Big Blue Chuchu
· Dark Nut · Big Blue Chuchu ![]() · Red Dark Nut · Black Knight
· Red Dark Nut · Black Knight
Bosses
Diababa · Fyrus · Morpheel · Stallord · Blizzeta · Armogohma · Argorok · Zant · Puppet Zelda · Ganon · Ganondorf ![]()
Sub-Bosses
Ook · King Bulblin · Dangoro · Twilit Carrier Kargarok · Twilit Bloat · Deku Toad · Death Sword · Darkhammer · Darknut · Aeralfos · Phantom Zant
Bosses
Stagnox · Fraaz · Phytops · Cragma · Byrne · Skeldritch · Demon Train · Chancellor Cole · Malladus
Stagnox II · Fraaz II · Phytops II · Cragma II · Skeldritch II · Dark Link![]()
Sub-Bosses
Mothula · Geozard · Rocktite · Ice Keese · Freezard · White Wolfos · Geozard Chief · Big Blin ![]() · Snapper · Helmet Chuchu · Metal Chuchu · Stalfos · Heatoise · Stalfos Warrior · Gerune · Ergtorok ·
· Snapper · Helmet Chuchu · Metal Chuchu · Stalfos · Heatoise · Stalfos Warrior · Gerune · Ergtorok ·
Bosses
Ghirahim ![]() · Scaldera · Moldarach · The Imprisoned
· Scaldera · Moldarach · The Imprisoned ![]() · Koloktos · Tentalus · Levias
· Koloktos · Tentalus · Levias ![]() · Bilocyte
· Bilocyte ![]() · Demise
· Demise
Sub-Bosses
Stalfos · Lizalfos · Stalmaster · Moldarach · LD-002G Scervo · Dark Lizalfos · Magmanos · Moldorm · Dreadfuse
Bosses
Yuga ![]() · Moldorm · Margomill · Gemesaur King · Arrghus · Knucklemaster · Stalblind · Zaganaga · Dharkstare · Grinexx · Yuga Ganon
· Moldorm · Margomill · Gemesaur King · Arrghus · Knucklemaster · Stalblind · Zaganaga · Dharkstare · Grinexx · Yuga Ganon
Sub-Bosses
Armos · Red Stalfos · Heedles · Green & Red Goriyas · Gigabari · Gibdos & Purple Mini-Moldorms · Red Eyegores · Flying Tiles & Devalants · Big Pengator & Pengators · Fire Gimos · Moldorm · Lorule Ball and Chain Soldier · Arrghus
StreetPass Bosses
Bosses
Margoma · Arrghus · Moldorm · Blizzagia · The Lady's Pets ![]() · Stalchampion · Prismantus · The Lady
· Stalchampion · Prismantus · The Lady
Shadow Link x3![]()
Mini-Bosses
Electric Blob King · Electric Blob Queen · Hinox Brothers · Freezlord · Vulture Vizier · Grim Repoe · Gigaleon
Bosses
Windblight Ganon · Fireblight Ganon · Master Kohga · Thunderblight Ganon · Waterblight Ganon · Calamity Ganon · Dark Beast Ganon ![]()
Sub-Bosses
Stone Talus · Igneo Talus · Frost Talus · Molduga · Hinox · Blue Hinox · Black Hinox · Stalnox · Igneo Talus Titan · Molduking
Bosses
Colgera · Mucktorok · Marbled Gohma · Queen Gibdo · Phantom Ganon · Seized Construct · The Demon King's Army · Demon King Ganondorf · Demon Dragon ![]()
Sub-Bosses
Flame Gleeok · Frost Gleeok · Sludge Like · Thunder Gleeok · King Gleeok · Yunobo · Frox · Flux Construct · Moragia · Molduga · Hinox · Stalnox · Frost Talus · Igneo Talus · Stone Talus · Battle Talus · Stone Talus (Luminous) · Ganondorf · Master Kohga · Phantom Ganon
| |||||||||||||||||||||||
.png)
Template:FireEnemy