(suggested move) |
Nick O'Demus (talk | contribs) mNo edit summary Tag: Source edit |
||
| (70 intermediate revisions by 14 users not shown) | |||
| Line 1: | Line 1: | ||
| + | {{Infobox Mechanic |
||
| − | {{Move|Minigames}} |
||
| + | |image= |
||
| + | |caption= |
||
| + | |pronunciation= |
||
| + | |game= {{TLoZ}}<br/>{{ALttP}}<br/>{{LA}}<br/>{{OoT}}<br/>{{MM}}<br/>{{OoS}}<br/>{{OoA}}<br/>{{TWW}}<br/>{{TMC}}<br/>{{TP}}<br/>{{PH}}<br/>{{ST}}<br/>{{SS}}<br/>{{ALBW}}<br/>{{TFH}}<br/>{{BotW}} |
||
| + | |other= |
||
| + | |purpose= |
||
| + | |related= |
||
| + | }} |
||
| + | {{Term/Store|Mini-Game|Mini-Games|Series, BotW|plural}},{{Exp Game|BotW}}<ref>{{Cite Guide|quote= |game= BotW |publisher= Piggyback |page= 332}}</ref> also known as {{Term/Store|Minigame|Minigames|OoS, TWWHD|plural}},{{Exp Game|OoS, TWWHD, TP}}<ref>{{Cite Guide|quote= |game= OoS|publisher= Nintendo|page= 2}}</ref><ref>{{Cite Guide|quote= |game= TWWHD|publisher= Prima|page= 348}}</ref><ref>{{Cite Guide|quote= |game= TP|publisher= Nintendo|page= 68}}</ref>{{Name Ref|TLoZ, ALttP, LA, OoT, MM, OoA, TWW, PH, ST, SS, ALBW, TFH}} are a recurring element in {{TLoZ|Series}}. {{Plural|Series|Mini-Game}} go unnamed in {{TMC}}. |
||
| + | ==Overview== |
||
| − | Minigames from the Legend of Zelda series. The minigames can range from short and easy to long and tedious and usually result in being awarded prizes such as [[Piece of Heart|Pieces of Heart]] or upgrades. |
||
| + | In most of their appearances, {{Plural|Series|Mini-Game}} are independent elements of the main game. They have a much smaller scale and the mechanics and rules might differ from the main game. {{Plural|Series|Mini-Game}} can range from short and easy to long and tedious, and usually result in being awarded prizes such as {{Plural|Series|Piece of Heart|link}} or upgrades. |
||
| − | {{#vardefine:settings| class="wikitable mw-collapsible mw-collapsed" style="width: 50em; margin:0 auto;" }} |
||
| + | |||
| + | ==List of {{Plural|Series|Minigame}}== |
||
| + | {{#vardefine:settings| class="wikitable"}} |
||
| + | |||
| + | ==={{TLoZ}}=== |
||
{| {{#var:settings}} |
{| {{#var:settings}} |
||
| + | ! Mini-Game |
||
| − | ! colspan="3" | {{TLoZ}} |
||
| + | ! Location |
||
| − | |- |
||
| − | ! Minigame |
||
! Cost |
! Cost |
||
! Reward |
! Reward |
||
|- |
|- |
||
| [[Gambling|Money Making Game]] |
| [[Gambling|Money Making Game]] |
||
| + | | |
||
| 10 |
| 10 |
||
| [[Rupee]]s |
| [[Rupee]]s |
||
|} |
|} |
||
| + | ==={{ALttP}}=== |
||
{| {{#var:settings}} |
{| {{#var:settings}} |
||
| + | ! Mini-Game |
||
| − | ! colspan="4" | {{ALTTP}} |
||
| − | |- |
||
| − | ! Minigame |
||
! Location |
! Location |
||
! Cost |
! Cost |
||
| Line 26: | Line 39: | ||
| South of [[Village of Outcasts]] |
| South of [[Village of Outcasts]] |
||
| 80 |
| 80 |
||
| − | | [[Rupee]]s<br>Stock Items<br>{{#vardefineecho:POH|[[Piece of Heart]]}} |
+ | | [[Rupee]]s<br/>Stock Items<br/>{{#vardefineecho:POH|[[Piece of Heart]]}} |
|- |
|- |
||
| [[Shooting Gallery]] |
| [[Shooting Gallery]] |
||
| Line 44: | Line 57: | ||
| [[Village of Outcasts]] |
| [[Village of Outcasts]] |
||
| 30 |
| 30 |
||
| − | | Two of the following:<br> |
+ | | Two of the following:<br/>[[Arrow]]s (1, 10)<br/>[[Bomb]] (1)<br/>{{#var:POH}}<br/>[[Heart]]<br/>[[Rupee]]s (1, 20, 50, 100) |
| − | [[Arrow]]s (1, 10)<br> |
||
| − | [[Bomb]] (1)<br> |
||
| − | {{#var:POH}}<br> |
||
| − | [[Heart]]<br> |
||
| − | [[Rupee]]s (1, 20, 50, 100) |
||
|} |
|} |
||
| + | ==={{LA}}=== |
||
| − | {| {{#var:settings}} |
||
| + | {{Mini-Game Table/H|LADX}} |
||
| − | ! colspan="4" | {{LA}} |
||
| + | {{Mini-Game Table|LADX|Fishing|{{Term|LADX|Mabe Village|link}}|{{Rupee|LADX|10}}|{{Rupee|LADX|5}}<br/>{{Rupee|LADX|20}}<br/>{{Term|LADX|Piece of Heart|link}}}} |
||
| − | |- |
||
| + | {{Mini-Game Table|LADX|Trendy Game|{{Term|LADX|Mabe Village|link}}|{{Rupee|LADX|10}}|{{Rupee|LADX|30}}<br/>{{Term|LADX|Shield|link}}<br/>[[Heart]]<br/>{{Term|LADX|Magic Powder|link}}<br/>{{Term|LADX|Yoshi Doll|link}}}} |
||
| − | ! Minigame |
||
| − | ! Location |
||
| − | ! Cost |
||
| − | ! Reward |
||
| − | |- |
||
| − | | [[Fishing]] |
||
| − | | [[Mabe Village]] |
||
| − | | 10 |
||
| − | | [[Rupee]]s (5, 20)<br>{{#var:POH}} |
||
| − | |- |
||
| − | | [[Trendy Game]] |
||
| − | | [[Mabe Village]] |
||
| − | | 10 |
||
| − | | 30 [[Rupee]]s<br>[[Shield]]<br>{{#var:POH}}<br>[[Yoshi Doll]] |
||
|} |
|} |
||
| + | ===={{LA|NS|-}}==== |
||
| + | {{Mini-Game Table/H|LANS}} |
||
| + | {{Mini-Game Table|LANS|Fishing|{{Term|LANS|Mabe Village|link}}|{{Rupee|LANS|10}}|{{Plural|LANS|Rupee|link}}{{How Many}}<br/>{{Term|LANS|Piece of Heart|link}} ×2<br/>{{Term|LANS|Secret Seashell|link}} ×2<br/>{{Term|LANS|Chamber Stone|link}} ×2<br/>{{Term|LANS|Fairy Bottle|link}}<br/>{{Term|LANS|Middleweight Lure|link}}<br/>{{Term|LANS|Heavyweight Lure|link}}}} |
||
| + | {{Mini-Game Table|LANS|Trendy Game|{{Term|LANS|Mabe Village|link}}|{{Rupee|LANS|10}}{{Note|The cost of the {{Term|LANS|Trendy Game}} is reduced to 5 {{Plural|LANS|Rupee|link}} once all 10 {{Plural|LANS|Figure}} have been obtained.}}|{{Rupee|LANS|20}}<br/>{{Rupee|LANS|50}}<br/>{{Term|LANS|Heart|link}}<br/>{{Term|LANS|Magic Powder|link}}<br/>{{Plural|LANS|Bomb|link}}<br/>{{Term|LANS|Shield|link}}<br/>{{Term|LANS|Piece of Heart|link}}<br/>{{Term|LANS|Yoshi Doll|link}}<br/>{{Term|LANS|Chamber Stone|link}}<br/>{{Term|LANS|CiaoCiao Figure|link}}<br/>{{Term|LANS|Goomba Figure|link}}<br/>{{Term|LANS|Cheep Cheep Figure|link}}<br/>{{Term|LANS|Spiny Figure|link}}<br/>{{Term|LANS|Boo Figure|link}}<br/>{{Term|LANS|Blooper Figure|link}}<br/>{{Term|LANS|Shy Guy Figure|link}}<br/>{{Term|LANS|Piranha Plant Figure|link}}<br/>{{Term|LANS|Pokey Figure|link}}<br/>{{Term|LANS|BowWow Figure|link}}}} |
||
| + | |} |
||
| + | |||
| + | ==={{OoT}}=== |
||
{| {{#var:settings}} |
{| {{#var:settings}} |
||
| + | ! Mini-Game |
||
| − | ! colspan="4" | {{OOT}} |
||
| − | |- |
||
| − | ! Minigame |
||
! Location |
! Location |
||
! Cost |
! Cost |
||
| Line 81: | Line 81: | ||
! colspan=4 | [[Young Link]] Only |
! colspan=4 | [[Young Link]] Only |
||
|- |
|- |
||
| − | | [[ |
+ | | [[Bombchu Bowling]] |
| − | | [[ |
+ | | [[Market]] |
| − | | 30 |
+ | | 30 Rupees |
| − | | Large [[Bomb Bag]]<br>{{#var:POH}} |
+ | | Large [[Bomb Bag]]<br/>{{#var:POH}}<br/>10 [[Bombchu]]s<br/>10 [[Bomb]]s<br/>50 [[Rupee]]s |
|- |
|- |
||
| + | | {{Term|OoT3D|Slingshot Target Practice|link}} |
||
| − | | [[Deku Scrub Slingshot Game]] |
||
| [[Lost Woods]] |
| [[Lost Woods]] |
||
| Free |
| Free |
||
| [[Bullet Bag]] upgrade |
| [[Bullet Bag]] upgrade |
||
|- |
|- |
||
| − | | [[ |
+ | | [[Heart-Pounding Gravedigging Tour]] |
| [[Kakariko Graveyard]] |
| [[Kakariko Graveyard]] |
||
| − | | 10 |
+ | | 10 Rupees |
| − | | [[Rupee]]s<br>{{#var:POH}} |
+ | | [[Rupee]]s<br/>{{#var:POH}} |
|- |
|- |
||
| [[Diving Game]] |
| [[Diving Game]] |
||
| [[Zora's Domain]] |
| [[Zora's Domain]] |
||
| − | | 20 |
+ | | 20 Rupees |
| − | | [[Rupee]]s<br>[[ |
+ | | [[Rupee]]s<br/>[[Silver Scale]] |
|- |
|- |
||
| [[Fabulous Five Froggish Tenors]] |
| [[Fabulous Five Froggish Tenors]] |
||
| [[Zora's River]] |
| [[Zora's River]] |
||
| Free |
| Free |
||
| − | | 50 [[Rupee]]s<br>{{#var:POH}} (2x) |
+ | | 50 [[Rupee]]s<br/>{{#var:POH}} (2x) |
|- |
|- |
||
| [[Musical Session]] |
| [[Musical Session]] |
||
| [[Lost Woods]] |
| [[Lost Woods]] |
||
| Free |
| Free |
||
| − | | [[Rupee]]s (1, 5, 20)<br>{{#var:POH}} |
+ | | [[Rupee]]s (1, 5, 20)<br/>{{#var:POH}} |
|- |
|- |
||
| + | | {{Term|OoT3D|Talon's Chicken Game|link}} |
||
| − | | [[Super Cucco Game]] |
||
| [[Lon Lon Ranch]] |
| [[Lon Lon Ranch]] |
||
| − | | 10 |
+ | | 10 Rupees |
| [[Bottle]] filled with [[Lon Lon Milk]] |
| [[Bottle]] filled with [[Lon Lon Milk]] |
||
|- |
|- |
||
| − | | [[Treasure Chest Game |
+ | | [[Treasure Chest Game]] |
| − | | [[ |
+ | | [[Market]] |
| − | | 10 |
+ | | 10 Rupees |
| − | | [[Rupee]]s (1, 5, 20, 50)<br>{{#var:POH}} |
+ | | [[Rupee]]s (1, 5, 20, 50)<br/>{{#var:POH}} |
|- |
|- |
||
! colspan=4 | [[Adult Link]] Only |
! colspan=4 | [[Adult Link]] Only |
||
| Line 125: | Line 125: | ||
| [[Horseback Archery Range]] |
| [[Horseback Archery Range]] |
||
| [[Gerudo's Fortress]] |
| [[Gerudo's Fortress]] |
||
| − | | 20 |
+ | | 20 Rupees |
| − | | {{#var:POH}}<br> [[ |
+ | | {{#var:POH}}<br/> [[Biggest Quiver]] |
|- |
|- |
||
! colspan=4 | Both Young and Adult Link |
! colspan=4 | Both Young and Adult Link |
||
|- |
|- |
||
| [[Fishing]] |
| [[Fishing]] |
||
| − | | |
+ | | {{Term|OoT3D|Fishing Pond|link}} |
| − | | 20 |
+ | | 20 Rupees |
| − | | [[ |
+ | | [[Golden Scale]]<br/>{{#var:POH}} |
|- |
|- |
||
| rowspan=2| [[Shooting Gallery]] |
| rowspan=2| [[Shooting Gallery]] |
||
| − | | |
+ | | {{Term|OoT3D|Market|link}}{{exp|Young Link}} |
| − | | rowspan=2| 20 |
+ | | rowspan=2| 20 Rupees |
| − | | [[Bullet Bag]] upgrade<br>50 [[Rupee]]s |
+ | | [[Bullet Bag]] upgrade<br/>50 [[Rupee]]s |
|- |
|- |
||
| [[Kakariko Village]] {{exp|Adult Link}} |
| [[Kakariko Village]] {{exp|Adult Link}} |
||
| − | | [[ |
+ | | [[Big Quiver]] <br/>50 [[Rupee]]s |
|} |
|} |
||
| + | ==={{MM}}=== |
||
| − | '''NOTE:''' Link will receive 50 rupees if he has already collected the Piece of Heart, or a [[Fishing Hole Pass]] in {{MM3D}}. |
||
| + | If {{Term|MM|Link}} completes a {{Term|MM|Mini-Game}} and has already collected the {{Term|MM|Piece of Heart|link}}, he will instead receive 50 {{Plural|MM|Rupee}}, or, in {{MM3D}}, a {{Term|MM3D|Fishing Hole Pass|link}}. |
||
{| {{#var:settings}} |
{| {{#var:settings}} |
||
| + | ! Mini-Game |
||
| − | ! colspan="5" | {{MM}} |
||
| − | |- |
||
| − | ! Minigame |
||
! Location |
! Location |
||
! Form |
! Form |
||
| Line 159: | Line 158: | ||
| [[North Clock Town]] |
| [[North Clock Town]] |
||
| Deku |
| Deku |
||
| − | | 10 |
+ | | 10 Rupees |
| − | | Piece of Heart |
+ | | 50 Rupees (daily)<br/>Piece of Heart (3-day streak) |
|- |
|- |
||
| [[Hide and Seek]] |
| [[Hide and Seek]] |
||
| [[North Clock Town]] |
| [[North Clock Town]] |
||
| − | | Deku<br>Human |
+ | | Deku<br/>Human |
| Free |
| Free |
||
| − | | Secret Code<br>[[Bombers' Notebook]] |
+ | | Secret Code<br/>[[Bombers' Notebook]] |
|- |
|- |
||
| [[Gambling#Lottery|Lottery]] |
| [[Gambling#Lottery|Lottery]] |
||
| [[West Clock Town]] |
| [[West Clock Town]] |
||
| Any |
| Any |
||
| − | | 10 |
+ | | 10 Rupees |
| − | | 50 Rupees |
+ | | 50 Rupees (once daily) |
|- |
|- |
||
| [[Swordsman's School]] |
| [[Swordsman's School]] |
||
| [[West Clock Town]] |
| [[West Clock Town]] |
||
| Human |
| Human |
||
| − | | 10 |
+ | | 10 Rupees |
| + | | Piece of Heart<br/>20 Rupees |
||
| − | | {{#var:POH}} |
||
|- |
|- |
||
| [[Honey and Darling's Shop]] |
| [[Honey and Darling's Shop]] |
||
| [[East Clock Town]] |
| [[East Clock Town]] |
||
| Human |
| Human |
||
| − | | 10 |
+ | | 10 Rupees |
| + | | 50 Rupees (daily)<br/>Piece of Heart (3-day streak) |
||
| − | | 50 [[Rupee]]s<br>{{#var:POH}} |
||
|- |
|- |
||
| [[Shooting Gallery]] |
| [[Shooting Gallery]] |
||
| [[East Clock Town]] |
| [[East Clock Town]] |
||
| Human |
| Human |
||
| − | | 20 |
+ | | 20 Rupees |
| − | | Larger Quiver<br>Piece of Heart |
+ | | Larger Quiver<br/>Piece of Heart |
|- |
|- |
||
|rowspan=4|[[Treasure Chest Game]] |
|rowspan=4|[[Treasure Chest Game]] |
||
|rowspan=4|[[East Clock Town]] |
|rowspan=4|[[East Clock Town]] |
||
| Human |
| Human |
||
| − | | 20 |
+ | | 20 Rupees |
| 50 Rupees |
| 50 Rupees |
||
|- |
|- |
||
| [[Deku Link|Deku]] |
| [[Deku Link|Deku]] |
||
| − | | 10 |
+ | | 10 Rupees |
| 10 [[Deku Nut]]s |
| 10 [[Deku Nut]]s |
||
|- |
|- |
||
| [[Goron Link|Goron]] |
| [[Goron Link|Goron]] |
||
| − | | 30 |
+ | | 30 Rupees |
| Piece of Heart |
| Piece of Heart |
||
|- |
|- |
||
| [[Zora Link|Zora]] |
| [[Zora Link|Zora]] |
||
| − | | 5 |
+ | | 5 Rupees |
| 20 Rupees |
| 20 Rupees |
||
|- |
|- |
||
| Line 215: | Line 214: | ||
| [[Southern Swamp]] |
| [[Southern Swamp]] |
||
| Human |
| Human |
||
| − | | 20 |
+ | | 20 Rupees |
| − | | Larger Quiver<br>Piece of Heart |
+ | | Larger Quiver<br/>Piece of Heart |
|- |
|- |
||
| − | | [[Shooting Gallery]] |
+ | | [[Boat Cruise]] [[Shooting Gallery]] |
| [[Swamp Tourist Center]] |
| [[Swamp Tourist Center]] |
||
| Human |
| Human |
||
| − | | 20 |
+ | | 20 Rupees |
| Piece of Heart |
| Piece of Heart |
||
|- |
|- |
||
| Line 229: | Line 228: | ||
| [[Milk Road]] |
| [[Milk Road]] |
||
| Human |
| Human |
||
| − | | 10 |
+ | | 10 Rupees |
| − | | [[Garo's Mask]] |
+ | | [[Garo's Mask]]<br/>[[Milk]] |
|- |
|- |
||
| [[Romani]]'s Target Practice |
| [[Romani]]'s Target Practice |
||
| Line 241: | Line 240: | ||
| [[Romani Ranch]] |
| [[Romani Ranch]] |
||
| Human |
| Human |
||
| − | | 10 |
+ | | 10-90 Rupees |
| − | | Rupees<br>Piece of Heart |
+ | | Rupees<br/>Piece of Heart |
|- |
|- |
||
!colspan=5|[[Snowhead]] |
!colspan=5|[[Snowhead]] |
||
| Line 250: | Line 249: | ||
| Goron |
| Goron |
||
| Free |
| Free |
||
| − | | [[Bottle]]<br>[[Gold Dust]] |
+ | | [[Bottle]]<br/>[[Gold Dust]] |
|- |
|- |
||
!colspan=5|[[Great Bay]] |
!colspan=5|[[Great Bay]] |
||
|- |
|- |
||
| − | | |
+ | | {{Term|MM3D|Beaver Race|link}} |
| [[Waterfall Rapids]] |
| [[Waterfall Rapids]] |
||
| Zora |
| Zora |
||
| Free |
| Free |
||
| − | | Bottle<br>Piece of Heart |
+ | | Bottle<br/>Piece of Heart |
|- |
|- |
||
| [[Fisherman's Jumping Game]] |
| [[Fisherman's Jumping Game]] |
||
| [[Great Bay Coast]] |
| [[Great Bay Coast]] |
||
| |
| |
||
| − | | 20 |
+ | | 20 Rupees |
| Piece of Heart |
| Piece of Heart |
||
|- |
|- |
||
| Zora Game Site |
| Zora Game Site |
||
| [[Great Bay Coast]] |
| [[Great Bay Coast]] |
||
| − | | Zora |
+ | | Zora<br/>Goron |
| − | | 10 |
+ | | 10 Rupees |
| − | | 100 |
+ | | 100 Rupees |
|- |
|- |
||
!colspan=5|[[Ikana]] |
!colspan=5|[[Ikana]] |
||
| Line 277: | Line 276: | ||
| [[Ikana Canyon]] |
| [[Ikana Canyon]] |
||
| |
| |
||
| − | | 30 or 10 |
+ | | 30 or 10 Rupees |
| Piece of Heart |
| Piece of Heart |
||
|} |
|} |
||
| + | ==={{OoS}}=== |
||
{| {{#var:settings}} |
{| {{#var:settings}} |
||
| + | ! Mini-Game |
||
| − | ! colspan="4" | {{OOA}} |
||
| + | ! Location |
||
| + | ! Cost |
||
| + | ! Reward |
||
|- |
|- |
||
| + | | [[Dance Hall]] |
||
| − | ! Minigame |
||
| + | | {{Term|OoS|Subrosia Village|link}} |
||
| + | | |
||
| + | | [[Boomerang]]<br/>[[Strange Flute]] |
||
| + | |- |
||
| + | | [[Treasure Chest Game]] |
||
| + | | [[Horon Village Shop]] |
||
| + | | 10 |
||
| + | | [[Magic Ring]]s |
||
| + | |} |
||
| + | |||
| + | ==={{OoA}}=== |
||
| + | {| {{#var:settings}} |
||
| + | ! Mini-Game |
||
! Location |
! Location |
||
! Cost |
! Cost |
||
| Line 292: | Line 308: | ||
| [[Rolling Ridge]] |
| [[Rolling Ridge]] |
||
| 10 |
| 10 |
||
| − | | [[Old Mermaid Key]]<br>[[Rupee]]s<br>[[Magic Ring]]s |
+ | | [[Old Mermaid Key]]<br/>[[Rupee]]s<br/>[[Gasha Seed]]s<br/>[[Magic Ring]]s |
|- |
|- |
||
| [[Goron Dance]] |
| [[Goron Dance]] |
||
| [[Rolling Ridge]] |
| [[Rolling Ridge]] |
||
| − | | 10{{exp|Present}}<br>20{{exp|Past}} |
+ | | 10{{exp|Present}}<br/>20{{exp|Past}} |
| − | | [[Mermaid Key]]<br>[[Brother Emblem]]<br>[[Rupee]]s (30, 50, 100)<br>[[Gasha Seed]]<br>[[Magic Ring]] |
+ | | [[Mermaid Key]]<br/>[[Brother Emblem]]<br/>[[Rupee]]s (30, 50, 100)<br/>[[Gasha Seed]]<br/>[[Magic Ring]] |
|- |
|- |
||
| [[Hide and Seek]] |
| [[Hide and Seek]] |
||
| Line 303: | Line 319: | ||
| Free |
| Free |
||
| Access to [[Wing Dungeon]] |
| Access to [[Wing Dungeon]] |
||
| + | |- |
||
| + | | {{Term|OoA|Patch's Crazy Cart|link}} |
||
| + | | {{Term|OoA|Restoration Wall|link}} |
||
| + | | Free |
||
| + | | Restoration of broken {{Plural|OoA|Item|link}} |
||
|- |
|- |
||
| rowspan=2| [[Shooting Gallery]] |
| rowspan=2| [[Shooting Gallery]] |
||
| [[Rolling Ridge]] |
| [[Rolling Ridge]] |
||
| 20 |
| 20 |
||
| − | | [[Lava Juice]]<br>[[Boomerang]]<br>30 [[Rupee]]s<br>20 [[Bomb]]s<br>[[Gasha Seed]] |
+ | | [[Lava Juice]]<br/>[[Boomerang]]<br/>30 [[Rupee]]s<br/>20 [[Bomb]]s<br/>[[Gasha Seed]] |
|- |
|- |
||
| − | | [[ |
+ | | [[Lynna Village]] |
| 10 |
| 10 |
||
| − | | [[Heart]]<br>30 [[Rupee]]s<br>[[Gasha Seed]]<br>[[Magic Ring]] |
+ | | [[Heart]]<br/>30 [[Rupee]]s<br/>[[Gasha Seed]]<br/>[[Magic Ring]] |
|- |
|- |
||
| [[Target Carts]] |
| [[Target Carts]] |
||
| [[Rolling Ridge]] |
| [[Rolling Ridge]] |
||
| 10 |
| 10 |
||
| − | | [[Rock Brisket]]<br>[[Boomerang]]<br>20 [[Rupee]]s<br>[[Gasha Seed]]<br>[[Bombchu]]s |
+ | | [[Rock Brisket]]<br/>[[Boomerang]]<br/>20 [[Rupee]]s<br/>[[Gasha Seed]]<br/>[[Bombchu]]s |
|- |
|- |
||
| [[Treasure Chest Game]] |
| [[Treasure Chest Game]] |
||
| Line 326: | Line 347: | ||
| [[Crescent Island]] |
| [[Crescent Island]] |
||
| 10 |
| 10 |
||
| − | | [[Scent Seedling]]<br>[[Rupee]]s<br>[[Gasha Seed]]s<br>[[Magic Ring]]s |
+ | | [[Scent Seedling]]<br/>[[Rupee]]s<br/>[[Gasha Seed]]s<br/>[[Magic Ring]]s |
|} |
|} |
||
| + | ==={{TWW}}=== |
||
{| {{#var:settings}} |
{| {{#var:settings}} |
||
| + | ! Mini-Game |
||
| − | ! colspan="4" | {{OOS}} |
||
| − | |- |
||
| − | ! Minigame |
||
! Location |
! Location |
||
! Cost |
! Cost |
||
! Reward |
! Reward |
||
|- |
|- |
||
| + | | {{Term|TWWHD|Cannon Minigame|link}} |
||
| − | | [[Dance Hall]] |
||
| + | | {{Term|TWWHD|Spectacle Island|link}} |
||
| − | | |
||
| + | | 50 [[Rupee]]s |
||
| − | | |
||
| + | | {{Term|TWWHD|Piece of Heart|link}}</br>{{Term|TWWHD|Treasure Chart|link}} #17</br>100 Rupees |
||
| − | | [[Boomerang]]<br>[[Strange Flute]] |
||
| + | |- |
||
| + | | {{Term|TWWHD|Squid-Hunt|link}} |
||
| + | | {{Term|TWWHD|Windfall Island|link}} |
||
| + | | 10 Rupees |
||
| + | | {{Term|TWWHD|Piece of Heart|link}}</br>{{Term|TWWHD|Treasure Chart|link}} #7</br>{{Term|TWWHD|Treasure Chart|link}} #23</br>Rupees (50, 200) |
||
|- |
|- |
||
| + | | {{Term|TWWHD|Piggy-Sitting|link}} |
||
| − | | [[Treasure Chest Game]] |
||
| + | | {{Term|TWWHD|Windfall Island|link}} |
||
| − | | [[Horon Village Shop]] |
||
| + | | 3 {{Term|TWWHD|Skull Necklace|link}}s |
||
| − | | 10 |
||
| + | | 50 Rupees</br>{{Term|TWWHD|Treasure Chart|link}} #42{{Exp|HD version only}} |
||
| − | | [[Magic Ring]]s |
||
| + | |- |
||
| + | | {{Term|TWWHD|Mail Center|link}} |
||
| + | | {{Term|TWWHD|Dragon Roost Island|link}} |
||
| + | | Free |
||
| + | | {{Term|TWWHD|Piece of Heart|link}}</br>20 Rupees |
||
| + | |- |
||
| + | | {{Term|TWWHD|Bird-Man Contest|link}} |
||
| + | | {{Term|TWWHD|Flight Control Platform|link}} |
||
| + | | 10 Rupees |
||
| + | | {{Term|TWWHD|Piece of Heart|link}}</br>50 Rupees |
||
| + | |- |
||
| + | | {{Term|TWWHD|Sliding Picture Puzzle|link}} |
||
| + | | {{Term|TWWHD|Private Oasis|link}} |
||
| + | | Free |
||
| + | | 50 Rupees (each puzzle)</br>200 Rupees (all puzzles) |
||
| + | |- |
||
| + | | {{Term|TWWHD|Sword Training|link}} |
||
| + | | {{Term|TWWHD|Outset Island|link}} |
||
| + | | Free |
||
| + | | {{Term|TWWHD|Piece of Heart|link}}</br>Rupees (50, 100, 200) |
||
| + | |- |
||
| + | | {{Term|TWWHD|Boating Course|link}} |
||
| + | | {{Term|TWWHD|Boating Course|link}} |
||
| + | | 30 Rupees |
||
| + | | Up to 150 Rupees |
||
| + | |- |
||
| + | | {{Term|TWWHD|Fishman|link}} Target Practice |
||
| + | | Any Island |
||
| + | | 1 serving of {{Term|TWWHD|All-Purpose Bait|link}} |
||
| + | | Up to 200 Rupees |
||
|} |
|} |
||
| + | ==={{TMC}}=== |
||
{| {{#var:settings}} |
{| {{#var:settings}} |
||
| + | ! Mini-Game |
||
| − | ! colspan="4" | {{TWW}} |
||
| − | |- |
||
| − | ! Minigame |
||
! Location |
! Location |
||
! Cost |
! Cost |
||
! Reward |
! Reward |
||
|- |
|- |
||
| + | | rowspan=4| Retrieving {{Term|TMC|Anju|link}}'s {{Plural|TMC|Cucco|link}} |
||
| − | | |
||
| + | | rowspan=4| {{Term|TMC|Hyrule Town|link}} |
||
| − | | |
||
| + | | rowspan=4| – |
||
| − | | |
||
| + | | {{Plural|TMC|Kinstone Piece|link}} |
||
| − | | |
||
| + | |- |
||
| + | | {{Plural|TMC|Mysterious Shell|link}} |
||
| + | |- |
||
| + | | {{Plural|TMC|Piece of Heart|link}} |
||
| + | |- |
||
| + | | {{Plural|TMC|Rupee|link}} |
||
| + | |- |
||
| + | | {{Term|TMC|Chest Mini-Game Shop|link}} |
||
| + | | {{Term|TMC|Hyrule Town|link}} |
||
| + | | 10 {{Plural|TMC|Rupee|link}} |
||
| + | | {{Plural|TMC|Rupee|link}} |
||
|- |
|- |
||
| + | | {{Term|TMC|Simon's Simulations|link}} |
||
| − | | |
||
| + | | {{Term|TMC|Hyrule Town|link}} |
||
| − | | |
||
| + | | 10 {{Plural|TMC|Rupee|link}} |
||
| − | | |
||
| + | | {{Plural|TMC|Rupee|link}} |
||
| − | | |
||
|} |
|} |
||
| + | ==={{TP}}=== |
||
{| {{#var:settings}} |
{| {{#var:settings}} |
||
| + | ! Mini-Game |
||
| − | ! colspan="4" | ''[[Minish Cap]]'' |
||
| − | |- |
||
| − | ! Minigame |
||
! Location |
! Location |
||
! Cost |
! Cost |
||
! Reward |
! Reward |
||
|- |
|- |
||
| + | | {{Term|TPHD|Hena's Fishing Hole|link}} |
||
| − | | |
||
| |
| |
||
| |
| |
||
| |
| |
||
|- |
|- |
||
| + | | {{Term|TPHD|Iza's Rapid Ride|link}} |
||
| |
| |
||
| + | | |
||
| + | | |
||
| + | |- |
||
| + | | {{Term|TPHD|Rollgoal|link}} |
||
| |
| |
||
| |
| |
||
| |
| |
||
| − | |} |
||
| − | |||
| − | {| {{#var:settings}} |
||
| − | ! colspan="4" | {{TP}} |
||
|- |
|- |
||
| + | | {{Term|TPHD|Sledding to Victory|link}} |
||
| − | ! Minigame |
||
| + | | |
||
| − | ! Location |
||
| + | | |
||
| − | ! Cost |
||
| + | | |
||
| − | ! Reward |
||
|- |
|- |
||
| + | | {{Term|TPHD|STAR Tent|link}} |
||
| − | | |
||
| |
| |
||
| |
| |
||
| |
| |
||
|- |
|- |
||
| + | | {{Term|TPHD|Flight-by-Fowl|link}} |
||
| |
| |
||
| + | | |
||
| + | | |
||
| + | |- |
||
| + | | {{Term|TPHD|Fruit-Pop-Flight|link}} |
||
| |
| |
||
| |
| |
||
| Line 405: | Line 475: | ||
|} |
|} |
||
| + | ==={{PH}}=== |
||
{| {{#var:settings}} |
{| {{#var:settings}} |
||
| + | ! Mini-Game |
||
| − | ! colspan="4" | {{PH}} |
||
| − | |- |
||
| − | ! Minigame |
||
! Location |
! Location |
||
! Cost |
! Cost |
||
! Reward |
! Reward |
||
|- |
|- |
||
| + | | align="center" | [[File:Cannon Game.png|200px]]<br/>'''[[Cannon Game]]''' |
||
| − | | |
||
| + | | {{Term|PH|Bannan Island|link}} |
||
| − | | |
||
| + | | {{Rupee|PH|20}} |
||
| − | | |
||
| + | | {{Term|PH|Bomb Bag|link}}<br/>{{Plural|PH|Rupee|link}}<br/>{{Plural|PH|Ship Part|link}} |
||
| − | | |
||
| + | |- |
||
| + | | align="center" | [[File:PH Lucky Lee.png|200px]]<br/>'''[[Digging Game]]''' |
||
| + | | {{Term|PH|Harrow Island|link}} |
||
| + | | {{Rupee|PH|50}} |
||
| + | | {{Plural|PH|Rupee}} (1, 5, 20, 50, 100)<br/>{{Plural|PH|Rupoor|link}} (10, 50)<br/>{{Plural|PH|Treasure Map|link}} {{Exp|Up to four}} |
||
| + | |- |
||
| + | | align="center" | '''{{Term|PH|Fishing|link}}''' |
||
| + | | {{Term|PH|World of the Ocean King|link}} |
||
| + | | Free |
||
| + | | {{Plural|PH|Fish|link}}<br/>{{Small|Traded for:}}<br/>{{Term|PH|Big Catch Lure|link}}<br/>{{Term|PH|Heart Container|link}}<br/>{{Plural|PH|Ship Part}} |
||
| + | |- |
||
| + | | align="center" | '''{{Term|PH|Goron Game|link}}''' |
||
| + | | {{Term|PH|Dee Ess Island|link}} |
||
| + | | {{Rupee|PH|50}} |
||
| + | | {{Term|PH|Bombchu Bag|link}}<br/>{{Plural|PH|Rupee}}<br/>{{Plural|PH|Ship Part}}<br/>{{Plural|PH|Treasure|link}} |
||
| + | |- |
||
| + | | rowspan="3" align="center" | '''{{Term|PH|Maze Island|link}}''' |
||
| + | | rowspan="3" | {{Term|PH|Maze Island}} |
||
| + | | Beginner: {{Rupee|PH|?}} |
||
| + | | {{Term|PH|Wisdom Gem|link}} |
||
|- |
|- |
||
| + | | Normal: {{Rupee|PH|?}} |
||
| − | | |
||
| + | | {{Term|PH|Treasure Map}} |
||
| − | | |
||
| − | | |
+ | |- |
| + | | Expert: {{Rupee|PH|?}} |
||
| − | | |
||
| + | | {{Term|PH|Heart Container}} |
||
| + | |- |
||
| + | | align="center" | [[File:PH Shooting Gallery 2.png|200px]]<br/>'''{{Term|PH|Shooting Gallery|link}}''' |
||
| + | | {{Term|PH|Molida Island|link}} |
||
| + | | {{Rupee|PH|?}} |
||
| + | | {{Term|PH|Quiver|link}}<br/>{{Term|PH|Heart Container}}<br/>{{Plural|PH|Ship Part}} |
||
| + | |- |
||
| + | | align="center" | '''{{Term|PH|Sword Training|link}}''' |
||
| + | | {{Term|PH|Prince of Red Lions Ship|link}}<br/>{{Small|Northwestern Sea}} |
||
| + | | Free |
||
| + | | {{Term|PH|Heart Container}}<br/>{{Plural|PH|Treasure}}<br/>{{Plural|PH|Ship Part}} |
||
|} |
|} |
||
| + | ==={{ST}}=== |
||
{| {{#var:settings}} |
{| {{#var:settings}} |
||
| + | ! Mini-Game |
||
| − | ! colspan="4" | {{ST}} |
||
| − | |- |
||
| − | ! Minigame |
||
! Location |
! Location |
||
! Cost |
! Cost |
||
! Reward |
! Reward |
||
|- |
|- |
||
| + | | align="center" | [[File:ST Goron Target Range.png|200px]]<br/>'''{{Term|ST|Goron Target Range|link}}''' |
||
| − | | |
||
| + | | {{Term|ST|Goron Target Range}}<br/>{{Small|({{Term|ST|Fire Realm|link}})}} |
||
| − | | |
||
| + | | {{Rupee|ST|20}} |
||
| − | | |
||
| + | | {{Plural|ST|Rupee}} (5, 20, 100, 200)<br/>{{Plural|ST|Treasure|link}} |
||
| − | | |
||
|- |
|- |
||
| + | | align="center" | '''{{Term|ST|Pirate Hideout|link}}''' |
||
| − | | |
||
| + | | {{Term|ST|Pirate Hideout}}<br/>{{Small|({{Term|ST|Ocean Realm|link}})}} |
||
| − | | |
||
| − | | |
+ | | Free |
| + | | {{Term|ST|Heart Container|link}}<br/>{{Term|ST|Quiver|link}}<br/>{{Plural|ST|Treasure}} |
||
| − | | |
||
| + | |- |
||
| + | | align="center" | [[File:Rabbit2.jpg|200px]]<br/>'''[[Rabbitland Rescue|Rabbit Catching]]''' |
||
| + | | Throughout [[New Hyrule]]<br/>{{Small|(While driving the {{Term|ST|Spirit Train|link}})}} |
||
| + | | Free |
||
| + | | {{Plural|ST|Rabbit|link}}<br/>{{Small|Traded for:}}<br/>{{Plural|ST|Rupee}}<br/>{{Term|ST|Heart Container}}<br/>{{Plural|ST|Treasure}}<br/>{{Term|ST|Swordsman's Scroll 1|link}} |
||
| + | |- |
||
| + | | align="center" | '''{{Term|ST|Sword Training|link}}''' |
||
| + | | {{Term|ST|Hyrule Castle|link}} |
||
| + | | {{Rupee|ST|20}} |
||
| + | | {{Term|ST|Heart Container}}<br/>{{Plural|ST|Treasure}} |
||
| + | |- |
||
| + | | align="center" | [[File:TakeEmAllOn.png|200px]]<br/>'''{{Term|ST|Take 'Em All On!|link}}''' |
||
| + | | {{Term|ST|Hyrule Castle Town|link}} |
||
| + | | {{Rupee|ST|50}} |
||
| + | | {{Term|ST|Heart Container}} {{Exp|Level 1}}<br/>{{Term|ST|Bomb Bag|link}} {{Exp|Level 2}}<br/>Rare {{Term|ST|Treasure}} {{Exp|Level 3}} |
||
| + | |- |
||
| + | | align="center" | '''{{Term|ST|Whip Race|link}}''' |
||
| + | | {{Term|ST|Whittleton|link}} |
||
| + | | {{Rupee|ST|50}} {{Note|If Link completes the Whip Race with a time of below 1:05.00, the cost will be reduced to 25 Rupees. However, if he can't afford this cost, he will be allowed to play for free.}} |
||
| + | | {{Term|ST|Bomb Bag}}<br/>{{Term|ST|Heart Container}}<br/>{{Plural|ST|Treasure}} |
||
|} |
|} |
||
| + | ==={{SS}}=== |
||
{| {{#var:settings}} |
{| {{#var:settings}} |
||
| + | ! Mini-Game |
||
| − | ! colspan="4" | {{SS}} |
||
| − | |- |
||
| − | ! Minigame |
||
! Location |
! Location |
||
! Cost |
! Cost |
||
! Reward |
! Reward |
||
|- |
|- |
||
| + | | align="center" | [[File:SSHD Bug Heaven.png|200px]]<br/>'''{{Term|SSHD|Bug Heaven|link}}''' |
||
| − | | |
||
| |
| |
||
| |
| |
||
| |
| |
||
|- |
|- |
||
| + | | align="center" | [[File:SSHD Clean Cut.png|200px]]<br/>'''{{Term|SSHD|Clean Cut|link}}''' |
||
| |
| |
||
| + | | |
||
| + | | |
||
| + | |- |
||
| + | | align="center" | [[File:SSHD Dodoh's High Dive.png|200px]]<br/>'''{{Term|SSHD|Dodoh's High Dive|link}}''' |
||
| |
| |
||
| |
| |
||
| |
| |
||
| − | |} |
||
| − | |||
| − | {| {{#var:settings}} |
||
| − | ! colspan="4" | {{ALBW}} |
||
|- |
|- |
||
| + | | align="center" | [[File:SSHD Harp Performance.png|200px]]<br/>'''{{Term|SSHD|Harp Performance|link}}''' |
||
| − | ! Minigame |
||
| + | | |
||
| − | ! Location |
||
| + | | |
||
| − | ! Cost |
||
| + | | |
||
| − | ! Reward |
||
|- |
|- |
||
| + | | align="center" | [[File:SSHD Pumpkin Pull.png|200px]]<br/>'''{{Term|SSHD|Pumpkin Pull|link}}''' |
||
| − | | |
||
| |
| |
||
| |
| |
||
| |
| |
||
|- |
|- |
||
| + | | align="center" | [[File:SSHD Rickety Coaster.png|200px]]<br/>'''{{Term|SSHD|Rickety Coaster|link}}''' |
||
| |
| |
||
| + | | |
||
| + | | |
||
| + | |- |
||
| + | | align="center" | [[File:SSHD Thrill Digger.png|200px]]<br/>'''{{Term|SSHD|Thrill Digger|link}}''' |
||
| + | | |
||
| + | | |
||
| + | | |
||
| + | |- |
||
| + | | align="center" | [[File:SSHD Thunder Dragon's Lightning Round.png|200px]]<br/>'''{{Term|SSHD|Thunder Dragon's Lightning Round|link}}''' |
||
| |
| |
||
| |
| |
||
| Line 481: | Line 610: | ||
|} |
|} |
||
| + | ==={{ALBW}}=== |
||
{| {{#var:settings}} |
{| {{#var:settings}} |
||
| + | ! Mini-Game |
||
| − | ! colspan="4" | {{BotW}} |
||
| + | ! Location |
||
| + | ! Cost |
||
| + | ! Reward |
||
|- |
|- |
||
| + | | rowspan="4" align="center" | [[File:CuccoRancheasyALBW.png|200px]]<br/>'''{{Term|ALBW|Cucco Ranch|link}}''' |
||
| − | ! Minigame |
||
| + | | rowspan="4" | South of {{Term|ALBW|Kakariko Village|link}}<br/>{{Small|(Hyrule)}} |
||
| + | | Egg: {{Rupee|ALBW|20}} |
||
| + | | {{Plural|ALBW|Rupee}} (40) |
||
| + | |- |
||
| + | | Chick: {{Rupee|ALBW|30}} |
||
| + | | {{Plural|ALBW|Rupee}} (60) |
||
| + | |- |
||
| + | | Rooster: {{Rupee|ALBW|50}} |
||
| + | | {{Plural|ALBW|Rupee}} (150)<br/>{{Term|ALBW|Piece of Heart|link}} |
||
| + | |- |
||
| + | | Endless: {{Rupee|ALBW|10}} |
||
| + | | {{Plural|ALBW|Rupee}} (up to 3,000)<br/>Large {{Term|ALBW|Cucco|link}} |
||
| + | |- |
||
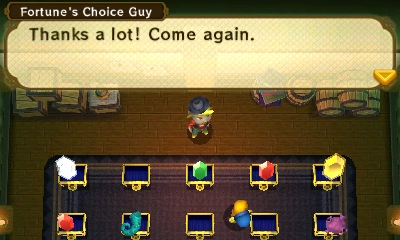
| + | | rowspan="2" align="center" | [[File:Fortune's Choice.png|200px]]<br/>'''{{Term|ALBW|Fortune's Choice|link}}''' |
||
| + | | {{Term|ALBW|Kakariko Village}}<br/>{{Small|(Hyrule)}} |
||
| + | | {{Rupee|ALBW|50}} |
||
| + | | {{Plural|ALBW|Rupee}} (1, 100) |
||
| + | |- |
||
| + | | {{Term|ALBW|Thieves' Town|link}}<br/>{{Small|(Lorule)}} |
||
| + | | {{Rupee|ALBW|200}} |
||
| + | | Three of the following:<br/>{{Term|ALBW|Piece of Heart}} {{Exp|Replaced with a Gold Rupee after collected}}<br/>{{Plural|ALBW|Rupee}} (1, 20, 100, 300)<br/>{{Term|ALBW|Monster Guts|link}}<br/>{{Term|ALBW|Monster Horn|link}}<br/>{{Term|ALBW|Monster Tail|link}} |
||
| + | |- |
||
| + | | align="center" | [[File:ALBW Hyrule Hotfoot.png|200px]]<br/>'''{{Term|ALBW|Hyrule Hotfoot|link}}''' |
||
| + | | {{Term|ALBW|Lake Hylia|link}} to {{Term|ALBW|Miner's House|link}}<br/>{{Small|(Hyrule)}} |
||
| + | | {{Rupee|ALBW|20}} |
||
| + | | {{Plural|ALBW|Rupee}} (100) {{Exp|Beginner}}<br/>{{Term|ALBW|Piece of Heart}} {{Exp|Intermediate}}<br/>{{Plural|ALBW|Rupee}} (300) {{Exp|Advanced}} |
||
| + | |- |
||
| + | | align="center" | [[File:ALBW Octoball Derby.png|200px]]<br/>'''{{Term|ALBW|Octoball Derby|link}}''' |
||
| + | | {{Term|ALBW|Lorule|link}} counterpart of {{Term|ALBW|Haunted Grove|link}} |
||
| + | | {{Rupee|ALBW|50}} |
||
| + | | {{Plural|ALBW|Rupee}}<br/>{{Term|ALBW|Piece of Heart}} |
||
| + | |- |
||
| + | | rowspan="2" align="center" | [[File:ALBW Rupee Rush.png|200px]]<br/>'''{{Term|ALBW|Rupee Rush|link}}''' |
||
| + | | Southwest of {{Term|ALBW|Kakariko Village}}<br/>{{Small|(Hyrule)}} |
||
| + | | {{Rupee|ALBW|50}} |
||
| + | | {{Plural|ALBW|Rupee}}<br/>{{Term|ALBW|Piece of Heart}} |
||
| + | |- |
||
| + | | Southwest of {{Term|ALBW|Thieves' Town}}<br/>{{Small|(Lorule)}} |
||
| + | | {{Rupee|ALBW|100}} |
||
| + | | {{Plural|ALBW|Rupee}}<br/>{{Term|ALBW|Piece of Heart}} |
||
| + | |- |
||
| + | | rowspan="3" align="center" | [[File:ALBW Treacherous Tower Exterior.png|200px]]<br/>'''{{Term|ALBW|Treacherous Tower|link}}''' |
||
| + | | rowspan="3" | {{Term|ALBW|Death Mountain|link}}<br/>{{Small|(Lorule)}} |
||
| + | | Beginner: {{Rupee|ALBW|100}} |
||
| + | | {{Plural|ALBW|Rupee}} |
||
| + | |- |
||
| + | | Intermediate: {{Rupee|ALBW|200}} |
||
| + | | {{Plural|ALBW|Rupee}}<br/>{{Term|ALBW|Piece of Heart|link}} |
||
| + | |- |
||
| + | | Advanced: {{Rupee|ALBW|300}} |
||
| + | | {{Plural|ALBW|Rupee}}<br/>{{Term|ALBW|Super Lamp|link}} {{Exp|Upon 1st completion}}<br/>{{Term|ALBW|Super Net|link}} {{Exp|Upon 2nd completion}} |
||
| + | |} |
||
| + | |||
| + | ==={{TFH}}=== |
||
| + | {| {{#var:settings}} |
||
| + | ! Mini-Game |
||
! Location |
! Location |
||
! Cost |
! Cost |
||
! Reward |
! Reward |
||
|- |
|- |
||
| + | | align="center" | [[File:TFH Daily Riches Exterior.png|200px]]<br/>'''{{Term|TFH|Daily Riches|link}}''' |
||
| − | | |
||
| + | | {{Term|TFH|Hytopia|link}} |
||
| − | | |
||
| + | | Free {{Note|Can only be played once per day, based on the Nintendo 3DS clock.}}<br/>{{Rupee|TFH|50}} {{Exp|To change the reward}} |
||
| − | | |
||
| + | | {{Plural|TFH|Material|link}}<br/>{{Term|TFH|Dapper Spinner|link}} {{Note|This item is not won in the mini-game, but becomes available for purchase after repeated plays.}} |
||
| − | | |
||
| + | |} |
||
| + | |||
| + | ==={{BotW}}=== |
||
| + | {| {{#var:settings}} |
||
| + | ! Mini-Game |
||
| + | ! Location |
||
| + | ! Cost |
||
| + | ! Primary Reward |
||
| + | ! Secondary Reward |
||
|- |
|- |
||
| + | |{{Term|BotW|All or Nothing|link}} |
||
| − | | |
||
| + | |{{Term|BotW|Lurelin Village|link}} |
||
| − | | |
||
| + | |10/50/100 |
||
| − | | |
||
| + | |{{Plural|BotW|Rupee}} |
||
| − | | |
||
| + | |N/A |
||
| + | |- |
||
| + | |{{Term|BotW|Bird-Man Research Study|link}} |
||
| + | |{{Term|BotW|Ridgeland Tower|link}} |
||
| + | |20 |
||
| + | |{{Plural|BotW|Rupee}} |
||
| + | |N/A |
||
| + | |- |
||
| + | |{{Term|BotW|Boom Bam Golf|link}} |
||
| + | |{{Term|BotW|Tanagar Canyon Course|link}} (under {{Term|BotW|Tabantha Great Bridge|link}}) |
||
| + | |20 |
||
| + | |{{Plural|BotW|Rupee}} |
||
| + | |N/A |
||
| + | |- |
||
| + | |{{Term|BotW|Carry the Ice!|link}} |
||
| + | |{{Term|BotW|Northern Icehouse|link}} |
||
| + | |50 |
||
| + | |"{{Term|BotW|The Perfect Drink|link}}" advancement |
||
| + | |{{Plural|BotW|Rupee}} |
||
| + | |- |
||
| + | |{{Term|BotW|Deer Hunting|link}} |
||
| + | |{{Term|BotW|Hateno Pasture|link}} |
||
| + | |0 |
||
| + | |{{Plural|BotW|Rupee}} |
||
| + | |N/A |
||
| + | |- |
||
| + | |{{Term|BotW|Flight Range (Mini-Game)|link}} |
||
| + | |{{Term|BotW|Flight Range|link}} |
||
| + | |0 |
||
| + | |"{{Term|BotW|Divine Beast Vah Medoh (Quest)|link}}" advancement |
||
| + | |{{Plural|BotW|Rupee}} |
||
| + | |- |
||
| + | |{{Term|BotW|Footrace|link}} |
||
| + | |{{Term|BotW|Footrace Check-In|link}} |
||
| + | |20 |
||
| + | |{{Plural|BotW|Rupee}} |
||
| + | |N/A |
||
| + | |- |
||
| + | |{{Term|BotW|Gut Check Rock Challenge|link}} |
||
| + | |{{Term|BotW|Gut Check Rock|link}} |
||
| + | |50/100 |
||
| + | |{{Term|BotW|Gorae Torr Shrine|link}} |
||
| + | |{{Plural|BotW|Rupee}}<br/>{{Term|BotW|Endura Shroom|link}}<br/>{{Term|BotW|Rushroom|link}} |
||
| + | |- |
||
| + | |{{Term|BotW|Horseback Archery|link}} |
||
| + | |{{Term|BotW|Mounted Archery Camp|link}} |
||
| + | |20 |
||
| + | |{{Term|BotW|Knight's Bridle|link}}<br/>{{Term|BotW|Knight's Saddle|link}} |
||
| + | |{{Plural|BotW|Rupee}} |
||
| + | |- |
||
| + | |{{Term|BotW|Obstacle Course|link}} |
||
| + | |{{Term|BotW|Highland Stable|link}} |
||
| + | |20 |
||
| + | |{{Term|BotW|Extravagant Bridle|link}}<br/>{{Term|BotW|Extravagant Saddle|link}} |
||
| + | |{{Plural|BotW|Rupee}}<br/>{{Term|BotW|Endura Carrot|link}}<br/>{{Term|BotW|Swift Carrot|link}} |
||
| + | |- |
||
| + | |{{Term|BotW|Paraglider Course|link}} |
||
| + | |{{Term|BotW|Eventide Island|link}} |
||
| + | |20 |
||
| + | |{{Plural|BotW|Rupee}} |
||
| + | |N/A |
||
| + | |- |
||
| + | |{{Term|BotW|Restoring the Blue Flame|link}} |
||
| + | |{{Term|BotW|East Akkala Stable|link}} |
||
| + | |20 |
||
| + | |{{Plural|BotW|Rupee}} |
||
| + | |N/A |
||
| + | |- |
||
| + | |{{Term|BotW|Sand-Seal Race|link}} |
||
| + | |{{Term|BotW|Sand-Seal Rally|link}} |
||
| + | |100 |
||
| + | |{{Term|BotW|Raqa Zunzo Shrine|link}} |
||
| + | |{{Plural|BotW|Rupee}} |
||
| + | |- |
||
| + | |{{Term|BotW|Shield-Surfing (Mini-Game)|link}} |
||
| + | |{{Term|BotW|Selmie's Spot|link}} |
||
| + | |20 |
||
| + | |{{Plural|BotW|Shield|link}} |
||
| + | |{{Plural|BotW|Rupee}} |
||
| + | |- |
||
| + | |{{Term|BotW|Snowball Bowling|link}} |
||
| + | |{{Term|BotW|Pondo's Lodge|link}} |
||
| + | |20 |
||
| + | |{{Plural|BotW|Rupee}} |
||
| + | |N/A |
||
| + | |- |
||
| + | |{{Term|BotW|Test of Wood|link}} |
||
| + | |{{Term|BotW|Lost Woods|link}} |
||
| + | |20 |
||
| + | |{{Term|BotW|Maag Halan Shrine|link}} |
||
| + | |{{Plural|BotW|Rupee}} |
||
|} |
|} |
||
| + | ==Nomenclature== |
||
| − | [[Category:Game elements]] |
||
| + | {{Nomenclature}} |
||
| + | |||
| + | ==See Also== |
||
| + | * {{Term|Series|Sidequest|link}} |
||
| + | * {{Term|Series|Shrine Quest|link}} |
||
| + | |||
| + | {{Notes}} |
||
| + | {{Ref}} |
||
| + | |||
| + | {{Categories |
||
| + | |mechanics= TLoZ, ALttP, LA, LADX, LANS, OoT, OoT3D, MM, MM3D, OoS, OoA, TWW, TWWHD, TMC, TP, TPHD, PH, ST, SS, SSHD, ALBW, TFH, BotW |
||
| + | }} |
||
Latest revision as of 14:42, 7 September 2023
Mini-Games,(BotW)[1] also known as Minigames,(OoS | TWWHD | TP)[2][3][4][name reference needed] are a recurring element in The Legend of Zelda series. Mini-Games go unnamed in The Minish Cap.
Overview
In most of their appearances, Mini-Games are independent elements of the main game. They have a much smaller scale and the mechanics and rules might differ from the main game. Mini-Games can range from short and easy to long and tedious, and usually result in being awarded prizes such as Pieces of Heart or upgrades.
List of Mini-Games
The Legend of Zelda
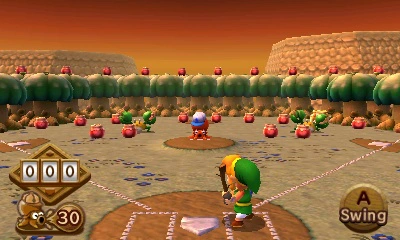
| Mini-Game | Location | Cost | Reward |
|---|---|---|---|
| Money Making Game | 10 | Rupees |
A Link to the Past
| Mini-Game | Location | Cost | Reward |
|---|---|---|---|
| Digging Game | South of Village of Outcasts | 80 | Rupees Stock Items Piece of Heart |
| Shooting Gallery | South of Village of Outcasts | 20 | Rupees |
| Treasure Chest Game | Kakariko Village | 20 | Rupees (1, 20, 50) |
| Lost Woods | 100 | Rupees (1, 20, 300) | |
| Village of Outcasts | 30 | Two of the following: Arrows (1, 10) Bomb (1) Piece of Heart Heart Rupees (1, 20, 50, 100) |
Link's Awakening
| Mini-Game | Location | Cost | Reward |
|---|---|---|---|
| File:LADX Fishing.png Fishing |
Mabe Village | Piece of Heart | |
| File:LADX Trendy Game.png Trendy Game |
Mabe Village | Shield Heart Magic Powder Yoshi Doll |
Link's Awakening for Nintendo Switch
Ocarina of Time
| Mini-Game | Location | Cost | Reward |
|---|---|---|---|
| Young Link Only | |||
| Bombchu Bowling | Market | 30 Rupees | Large Bomb Bag Piece of Heart 10 Bombchus 10 Bombs 50 Rupees |
| Slingshot Target Practice | Lost Woods | Free | Bullet Bag upgrade |
| Heart-Pounding Gravedigging Tour | Kakariko Graveyard | 10 Rupees | Rupees Piece of Heart |
| Diving Game | Zora's Domain | 20 Rupees | Rupees Silver Scale |
| Fabulous Five Froggish Tenors | Zora's River | Free | 50 Rupees Piece of Heart (2x) |
| Musical Session | Lost Woods | Free | Rupees (1, 5, 20) Piece of Heart |
| Super Cucco-findin' Game | Lon Lon Ranch | 10 Rupees | Bottle filled with Lon Lon Milk |
| Treasure Chest Game | Market | 10 Rupees | Rupees (1, 5, 20, 50) Piece of Heart |
| Adult Link Only | |||
| Horseback Archery Range | Gerudo's Fortress | 20 Rupees | Piece of Heart Biggest Quiver |
| Both Young and Adult Link | |||
| Fishing | Fishing Pond | 20 Rupees | Golden Scale Piece of Heart |
| Shooting Gallery | Market |
20 Rupees | Bullet Bag upgrade 50 Rupees |
| Kakariko Village |
Big Quiver 50 Rupees | ||
Majora's Mask
If Link completes a Mini-Game and has already collected the Piece of Heart, he will instead receive 50 Rupees, or, in Majora's Mask 3D, a Fishing Hole Pass.
| Mini-Game | Location | Form | Cost | Reward |
|---|---|---|---|---|
| Clock Town | ||||
| Deku Scrub Playground | North Clock Town | Deku | 10 Rupees | 50 Rupees (daily) Piece of Heart (3-day streak) |
| Hide and Seek | North Clock Town | Deku Human |
Free | Secret Code Bombers' Notebook |
| Lottery | West Clock Town | Any | 10 Rupees | 50 Rupees (once daily) |
| Swordsman's School | West Clock Town | Human | 10 Rupees | Piece of Heart 20 Rupees |
| Honey and Darling's Shop | East Clock Town | Human | 10 Rupees | 50 Rupees (daily) Piece of Heart (3-day streak) |
| Shooting Gallery | East Clock Town | Human | 20 Rupees | Larger Quiver Piece of Heart |
| Treasure Chest Game | East Clock Town | Human | 20 Rupees | 50 Rupees |
| Deku | 10 Rupees | 10 Deku Nuts | ||
| Goron | 30 Rupees | Piece of Heart | ||
| Zora | 5 Rupees | 20 Rupees | ||
| Southern Swamp | ||||
| Shooting Gallery | Southern Swamp | Human | 20 Rupees | Larger Quiver Piece of Heart |
| Boat Cruise Shooting Gallery | Swamp Tourist Center | Human | 20 Rupees | Piece of Heart |
| Milk Road | ||||
| Gorman Track | Milk Road | Human | 10 Rupees | Garo's Mask Milk |
| Romani's Target Practice | Romani Ranch | Human | Free | Epona's Song |
| Doggy Racetrack | Romani Ranch | Human | 10-90 Rupees | Rupees Piece of Heart |
| Snowhead | ||||
| Goron Race | Goron Racetrack | Goron | Free | Bottle Gold Dust |
| Great Bay | ||||
| Beaver Race | Waterfall Rapids | Zora | Free | Bottle Piece of Heart |
| Fisherman's Jumping Game | Great Bay Coast | 20 Rupees | Piece of Heart | |
| Zora Game Site | Great Bay Coast | Zora Goron |
10 Rupees | 100 Rupees |
| Ikana | ||||
| Spirit House | Ikana Canyon | 30 or 10 Rupees | Piece of Heart | |
Oracle of Seasons
| Mini-Game | Location | Cost | Reward |
|---|---|---|---|
| Dance Hall | Subrosia Village | Boomerang Strange Flute | |
| Treasure Chest Game | Horon Village Shop | 10 | Magic Rings |
Oracle of Ages
| Mini-Game | Location | Cost | Reward |
|---|---|---|---|
| Big Bang Game | Rolling Ridge | 10 | Old Mermaid Key Rupees Gasha Seeds Magic Rings |
| Goron Dance | Rolling Ridge | 10 20 |
Mermaid Key Brother Emblem Rupees (30, 50, 100) Gasha Seed Magic Ring |
| Hide and Seek | Fairies' Woods | Free | Access to Wing Dungeon |
| Patch's Crazy Cart | Restoration Wall | Free | Restoration of broken Items |
| Shooting Gallery | Rolling Ridge | 20 | Lava Juice Boomerang 30 Rupees 20 Bombs Gasha Seed |
| Lynna Village | 10 | Heart 30 Rupees Gasha Seed Magic Ring | |
| Target Carts | Rolling Ridge | 10 | Rock Brisket Boomerang 20 Rupees Gasha Seed Bombchus |
| Treasure Chest Game | Lynna City Shop | 10 | Magic Rings |
| Wild Tokay | Crescent Island | 10 | Scent Seedling Rupees Gasha Seeds Magic Rings |
The Wind Waker
| Mini-Game | Location | Cost | Reward |
|---|---|---|---|
| Cannon Minigame | Spectacle Island | 50 Rupees | Piece of Heart Treasure Chart #17 100 Rupees |
| Squid-Hunt | Windfall Island | 10 Rupees | Piece of Heart Treasure Chart #7 Treasure Chart #23 Rupees (50, 200) |
| Piggy-Sitting | Windfall Island | 3 Skull Necklaces | 50 Rupees Treasure Chart #42 |
| Mail Center | Dragon Roost Island | Free | Piece of Heart 20 Rupees |
| Bird-Man Contest | Flight Control Platform | 10 Rupees | Piece of Heart 50 Rupees |
| Sliding Picture Puzzle | Private Oasis | Free | 50 Rupees (each puzzle) 200 Rupees (all puzzles) |
| Sword Training | Outset Island | Free | Piece of Heart Rupees (50, 100, 200) |
| Boating Course | Boating Course | 30 Rupees | Up to 150 Rupees |
| Fishman Target Practice | Any Island | 1 serving of All-Purpose Bait | Up to 200 Rupees |
The Minish Cap
| Mini-Game | Location | Cost | Reward |
|---|---|---|---|
| Retrieving Anju's Cuccos | Hyrule Town | – | Kinstone Pieces |
| Mysterious Shells | |||
| Pieces of Heart | |||
| Rupees | |||
| Chest Mini-Game Shop | Hyrule Town | 10 Rupees | Rupees |
| Simon's Simulations | Hyrule Town | 10 Rupees | Rupees |
Twilight Princess
| Mini-Game | Location | Cost | Reward |
|---|---|---|---|
| Hena's Fishing Hole | |||
| Iza's Rapid Ride | |||
| Rollgoal | |||
| Sledding to Victory | |||
| STAR Tent | |||
| Flight-by-Fowl | |||
| Fruit-Pop-Flight |
Phantom Hourglass
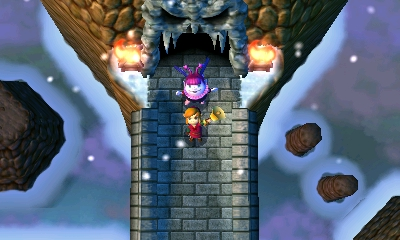
| Mini-Game | Location | Cost | Reward |
|---|---|---|---|
 Cannon Game |
Bannan Island | Bomb Bag Rupees Ship Parts | |
 Digging Game |
Harrow Island | Rupees (1, 5, 20, 50, 100) Rupoors (10, 50) Treasure Maps | |
| Fishing | World of the Ocean King | Free | Fish Traded for: Big Catch Lure Heart Container Ship Parts |
| Goron Game | Dee Ess Island | Bombchu Bag Rupees Ship Parts Treasures | |
| Maze Island | Maze Island | Beginner: |
Wisdom Gem |
| Normal: |
Treasure Map | ||
| Expert: |
Heart Container | ||
 Shooting Gallery |
Molida Island | Quiver Heart Container Ship Parts | |
| Sword Training | Prince of Red Lions Ship Northwestern Sea |
Free | Heart Container Treasures Ship Parts |
Spirit Tracks
| Mini-Game | Location | Cost | Reward |
|---|---|---|---|
 Goron Target Range |
Goron Target Range (Fire Realm) |
Rupees (5, 20, 100, 200) Treasures | |
| Pirate Hideout | Pirate Hideout (Ocean Realm) |
Free | Heart Container Quiver Treasures |
 Rabbit Catching |
Throughout New Hyrule (While driving the Spirit Train) |
Free | Rabbits Traded for: Rupees Heart Container Treasures Swordsman's Scroll 1 |
| Sword Training | Hyrule Castle | Heart Container Treasures | |
 Take 'Em All On! |
Castle Town | Heart Container Bomb Bag Rare Treasure | |
| Whip Race | Whittleton | Bomb Bag Heart Container Treasures |
Skyward Sword
A Link Between Worlds
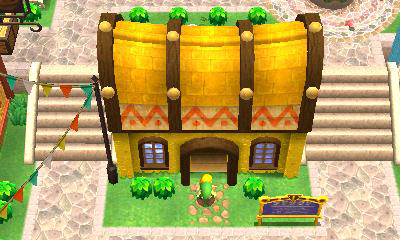
| Mini-Game | Location | Cost | Reward |
|---|---|---|---|
 Cucco Ranch |
South of Kakariko Village (Hyrule) |
Egg: |
Rupees (40) |
| Chick: |
Rupees (60) | ||
| Rooster: |
Rupees (150) Piece of Heart | ||
| Endless: |
Rupees (up to 3,000) Large Cucco | ||
 Fortune's Choice |
Kakariko Village (Hyrule) |
Rupees (1, 100) | |
| Thieves' Town (Lorule) |
Three of the following: Piece of Heart Rupees (1, 20, 100, 300) Monster Guts Monster Horn Monster Tail | ||
 Hyrule Hotfoot |
Lake Hylia to Miner's House (Hyrule) |
Rupees (100) Piece of Heart Rupees (300) | |
 Octoball Derby |
Lorule counterpart of Haunted Grove | Rupees Piece of Heart | |
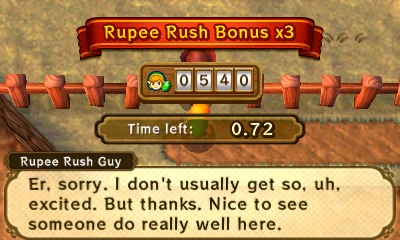 Rupee Rush |
Southwest of Kakariko Village (Hyrule) |
Rupees Piece of Heart | |
| Southwest of Thieves' Town (Lorule) |
Rupees Piece of Heart | ||
 Treacherous Tower |
Death Mountain (Lorule) |
Beginner: |
Rupees |
| Intermediate: |
Rupees Piece of Heart | ||
| Advanced: |
Rupees Super Lamp Super Net |
Tri Force Heroes
| Mini-Game | Location | Cost | Reward |
|---|---|---|---|
 Daily Riches |
Hytopia | Free [note 3] |
Materials Dapper Spinner [note 4] |
Breath of the Wild
Nomenclature
| Language | Name | Meaning | |
|---|---|---|---|
| Japanese | ミニゲーム (Minigēmu) (LANS) | Minigame | |
| This table was generated using translation pages. To request an addition, please contact a staff member with a reference. | |||
See Also
Notes
- ↑ The cost of the Trendy Game is reduced to 5 Rupees once all 10 Figures have been obtained.
- ↑ If Link completes the Whip Race with a time of below 1:05.00, the cost will be reduced to 25 Rupees. However, if he can't afford this cost, he will be allowed to play for free.
- ↑ Can only be played once per day, based on the Nintendo 3DS clock.
- ↑ This item is not won in the mini-game, but becomes available for purchase after repeated plays.
References
- ↑ The Legend of Zelda: Breath of the Wild — The Complete Official Guide, Piggyback Interactive Limited, pg. 332
- ↑ The Legend of Zelda: Oracle of Seasons and Oracle of Ages — The Official Nintendo Player's Guide, Nintendo of America, pg. 2
- ↑ The Legend of Zelda: The Wind Waker HD PRIMA Official Game Guide, Prima Games, pg. 348
- ↑ The Legend of Zelda: Twilight Princess — The Official Nintendo Player's Guide, Nintendo of America, pg. 68